Clearing your gutters before winter freezes prevents catastrophic water damage, roof rot, and heavy ice dams. A single afternoon of proactive maintenance safeguards your eaves and foundation against costly cold-weather repairs.
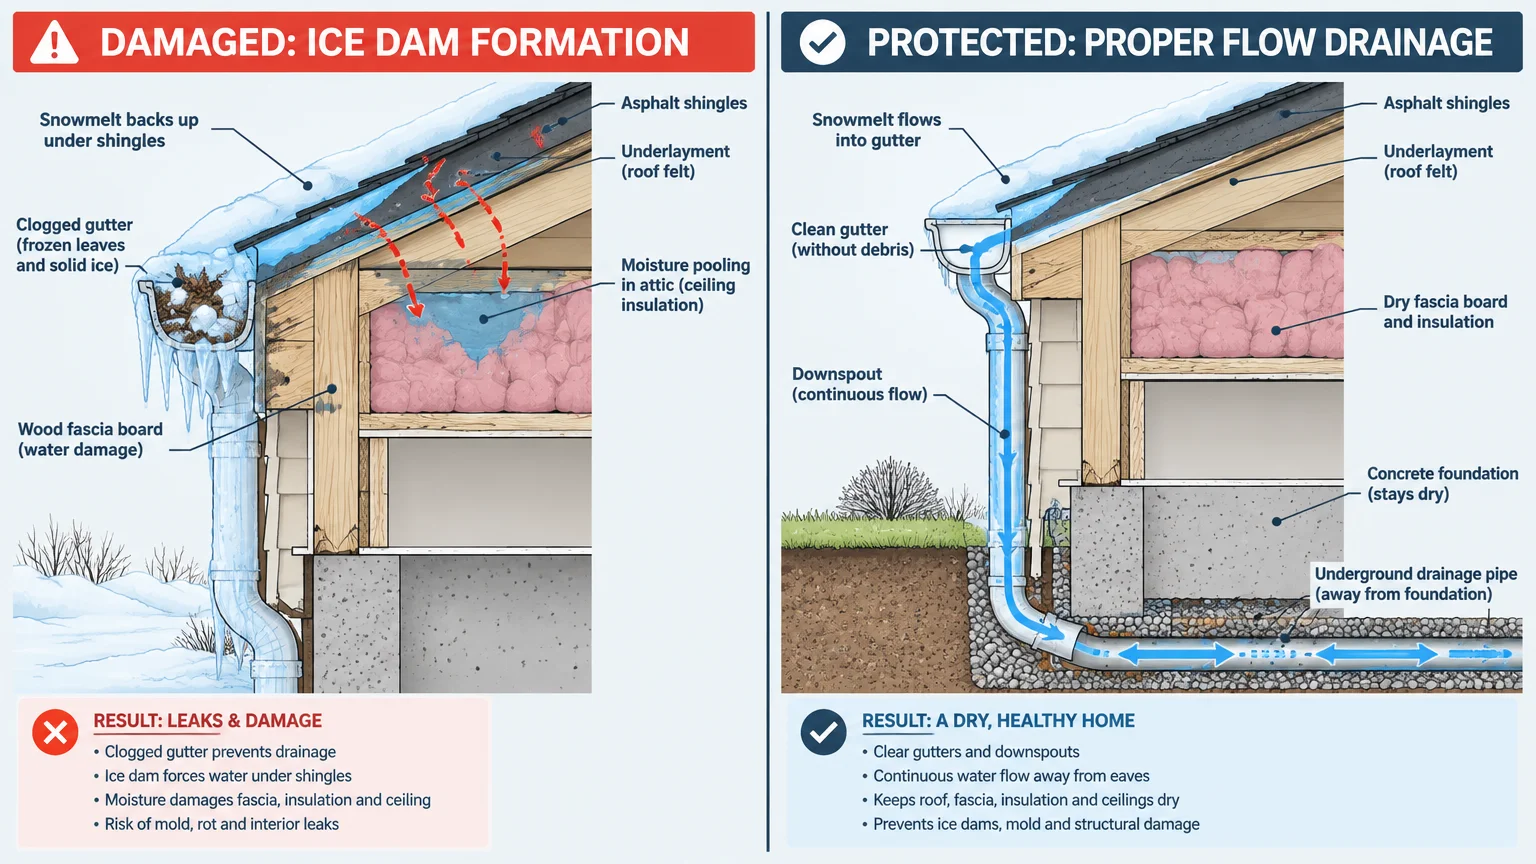
When trapped autumn leaves freeze into solid troughs of ice, expanding moisture pulls fasteners straight out of your fascia boards. Melting snow then backs up under shingles, finding paths into your interior ceilings and walls.
Tackling this seasonal chore with the right technique protects your home while keeping your footing secure on the ladder. Here is your actionable game plan to clear channels and fortify drainage before the ground freezes solid.

Winter Gutter Maintenance Planning Snapshot
You can accomplish this complete gutter overhaul over a single weekend afternoon. Dedicate two to four hours depending on your roofline perimeter and nearby tree canopy density.
Most homeowners handle this task as an accessible, entry-level maintenance project. You only need basic balance, steady comfort on a ladder, and standard garden tools.
Material costs remain minimal if you already own an extension ladder and a garden hose. Expect to spend modest amounts on replacement brackets, exterior sealant, or specialized scoops.
Renting a taller ladder or purchasing gutter guard inserts slightly raises your upfront investment. However, routine self-cleaning avoids thousand-dollar structural repairs down the road.
Phase 1: Preparation and Ladder Safety Protocols
Winter gutter cleaning carries unique physical risks because frozen surfaces reduce ground traction. Establishing a stable foundation prevents catastrophic falls before you ever lift your hands to the eaves.
Tip 1: Secure Your Ladder with Proper Pitch and Stabilizers
Always position your ladder on firm, level ground before climbing toward the eaves. Soft garden loam or frozen turf can shift unexpectedly beneath the ladder feet during your ascent.
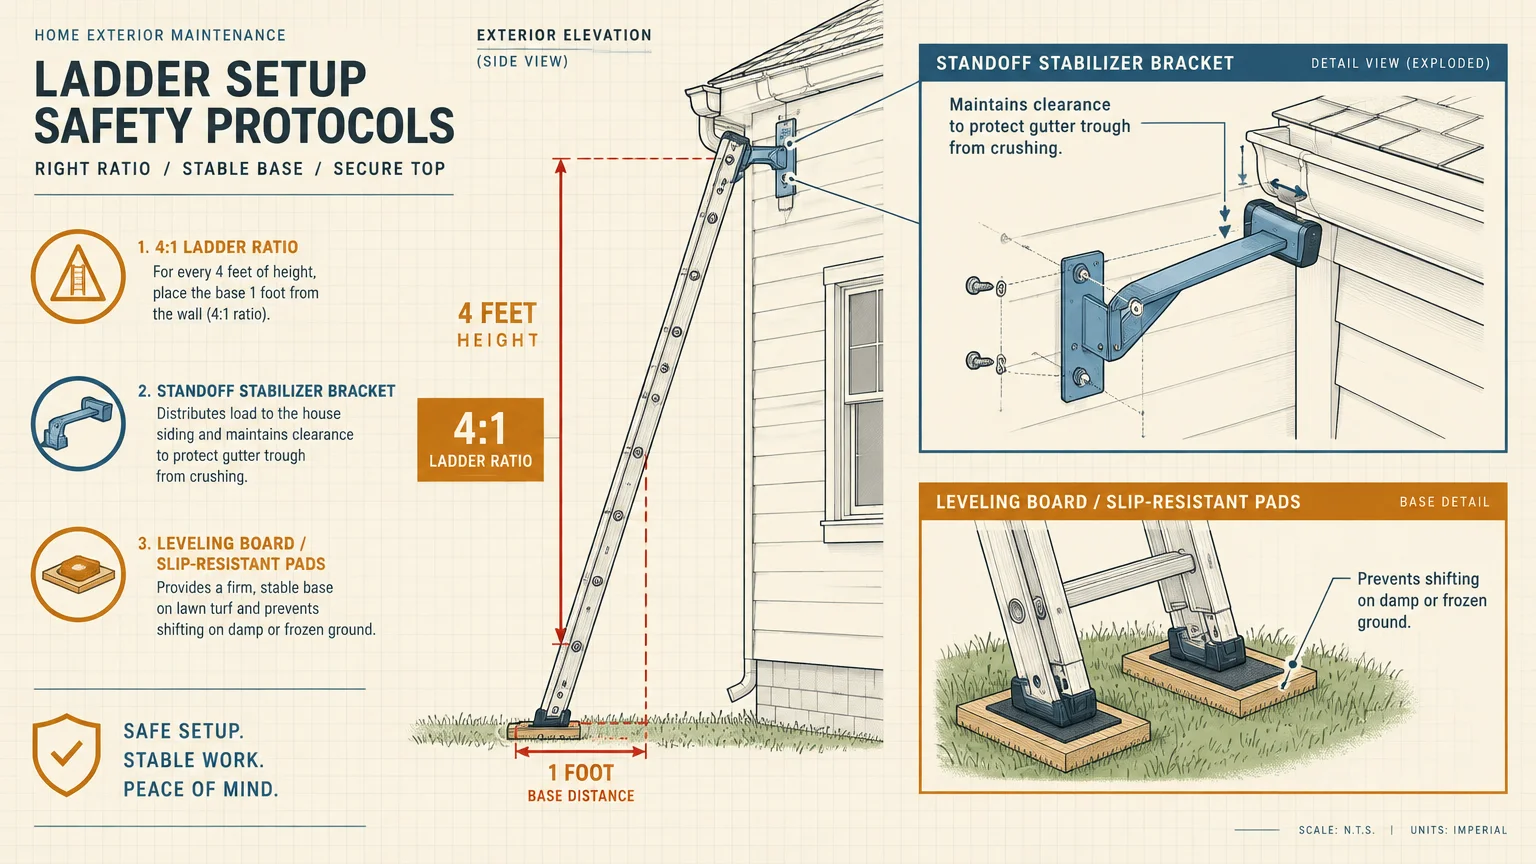
Use slip-resistant leveling pads or wide wooden boards beneath the ladder feet when working over damp soil. These platforms distribute your weight evenly and prevent dangerous sinking.
Set your ladder angle using the four-to-one ratio recommended by ladder safety standards. For every four feet of vertical wall height, pull the ladder base out one foot.
Attach a standoff stabilizer bracket to the upper rails before leaning the frame against your house. According to the Occupational Safety and Health Administration guidelines, secure contact surfaces prevent lateral slipping while keeping weight off fragile aluminum troughs.
Never rest your ladder rails directly against delicate gutters; the concentrated pressure bends metal and loosens fascia spikes. Move the ladder frequently rather than dangerously overreaching past your arm span.
Tip 2: Assemble Protective Gear and Ergonomic Tools
Cold gutter sludge chills hands quickly, which dulls your reflexes and weakens your grip. Wear thick, waterproof work gloves lined with fleece to keep your fingers warm and dexterous.
Heavy-duty gloves also shield your skin from hidden roofing nails, jagged metal edges, and sharp twigs. Pair them with impact-resistant safety glasses to deflect snapping branches or dislodged debris.
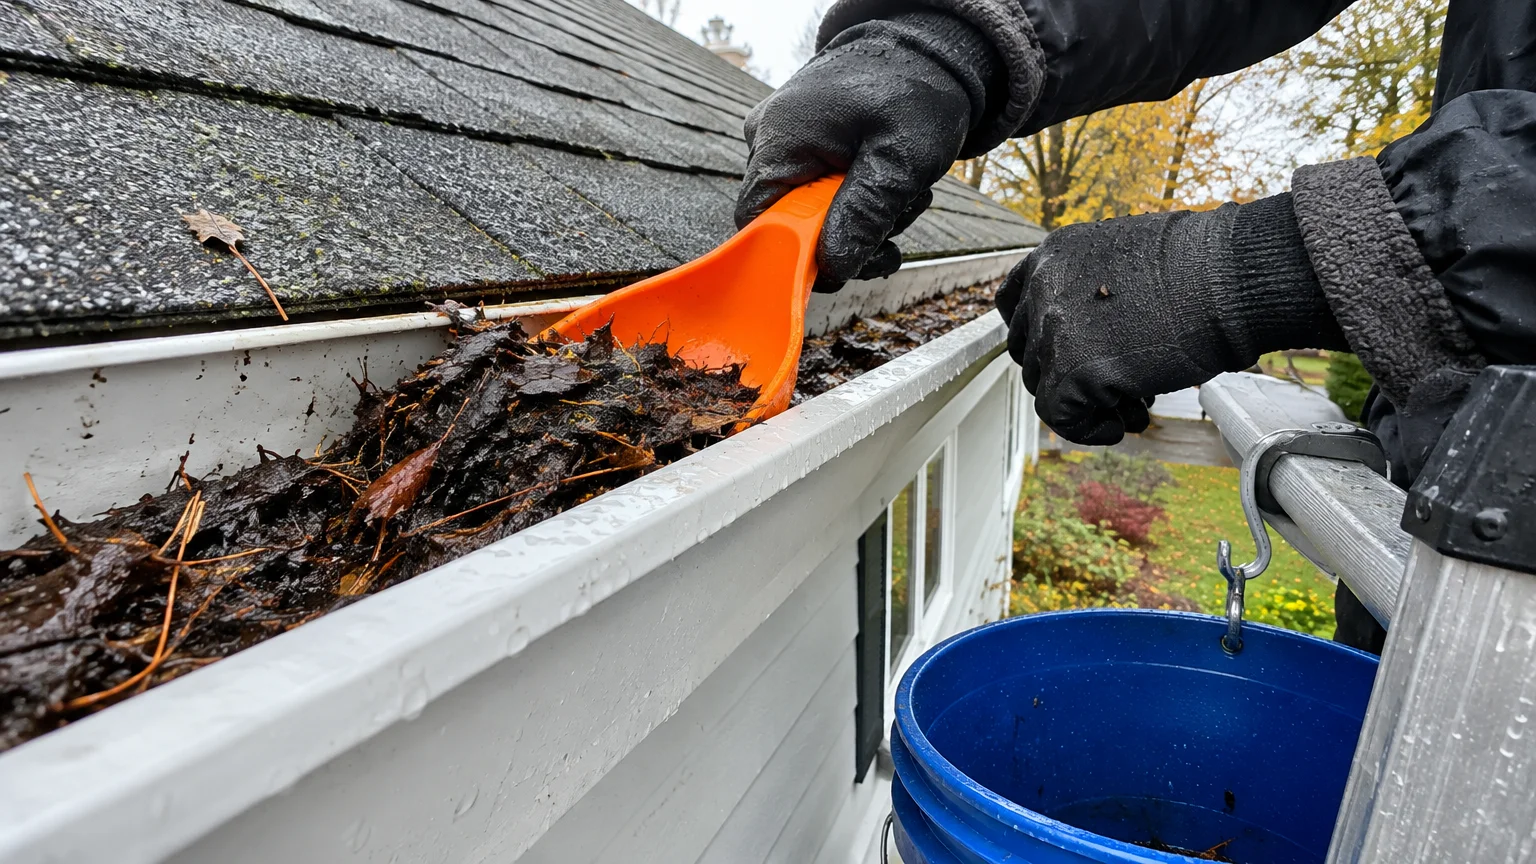
Select an ergonomic plastic gutter scoop rather than a sharp metal garden trowel for lifting muck. Plastic contours smoothly against aluminum channels without scratching factory coatings or puncturing thin metal seams.
Hang a five-gallon utility bucket from an S-hook on your ladder rung to catch waste. Dropping wet leaves directly into a bucket eliminates hours of messy raking on your lawn afterward.
Tip 3: Schedule Work During Dry Afternoon Windows
Clean your system late in the autumn season once nearby deciduous trees have dropped their canopies. Waiting for the final leaf drop avoids repeating this physical chore multiple times.
Target a clear, sunny afternoon when outside temperatures climb above the freezing mark. Lingering morning frost creates slick ladder rungs and turns gutter sediment into unyielding bricks of frozen mud.
Warm midday sunlight softens gummy organic matter, making leaf sludge significantly easier to lift. Working in dry weather also ensures exterior sealants cure properly if you discover leaking joints.
Phase 2: Active Trough Clearing and Downspout Care
Efficient gutter clearing requires a methodical sequence to avoid pushing clogs deep into underground drains. Working rhythmically from ends toward drops saves energy and protects drainage lines.
Tip 4: Scoop Away From Downspout Openings First
Begin your scoop work directly adjacent to the downspout drop opening to protect the vertical pipe. Clearing this exit area first prevents loose debris from falling downward while you work along the run.
Insert a temporary wire mesh strainer or rag plug into the drop opening before scraping adjacent channels. This temporary barricade ensures dislodged twigs and pine needles cannot tumble into vertical elbows.
Pull accumulated leaf matter toward yourself in manageable scoops rather than pushing heavy loads forward. Place each scoop immediately into your bucket instead of letting wet muck drop onto shrubs below.
Work in sections that span no more than two or three feet to maintain stability. Reposition your ladder deliberately as you advance along the perimeter of the roofline.
Tip 5: Flush Troughs with a Controlled Hose Stream
Once you extract bulky leaves and twigs, wash away lingering silt with a high-pressure garden hose. Fine roof grit settles along the bottom, creating a muddy substrate that invites moss growth.
Spray water toward the downspout opening to confirm that gravity carries moisture freely along the channel. Watch closely for low spots where standing water pools behind slight bends or loose fasteners.
Standing water expands when winter temperatures dip below freezing, generating internal pressures that split aluminum seams. Level troughs ensure every drop evacuates quickly before subfreezing winds arrive.
Drain and store your garden hose indoors as soon as you finish the flushing process. Unhooking hoses protects exterior sillcocks from burst pipes when nighttime temperatures freeze solid.
Tip 6: Clear Downspout Clogs with a Plumber’s Snake
When water backs up at the elbow during flushing, clear the vertical conduit immediately. Trapped moisture inside a downspout freezes into an icy column that ruptures metal seams.
Tap the exterior metal downspout lightly with a screwdriver handle to pinpoint where dull thuds indicate blockages. Often, pine cones and compressed oak leaves wedge tightly inside curved upper elbows.
Feed an inexpensive handheld drum auger or plumber’s snake downward through the opening to break apart stubborn debris. Rotate the cable mechanism while pushing gently to dislodge packed leaf plugs without denting sheet metal.
For persistent lower clogs, remove the bottom curved elbow by loosening sheet metal screws. Clearing the discharge end allows gravity and water pressure to push obstructions out cleanly.
Phase 3: Structural Inspection and Ice Prevention
Clean channels provide the perfect vantage point to inspect structural integrity before winter storms strike. Ice and snow add tremendous weight, punishing any mechanical weakness in your drainage system.
Tip 7: Verify Gutter Slope and Tighten Loose Brackets
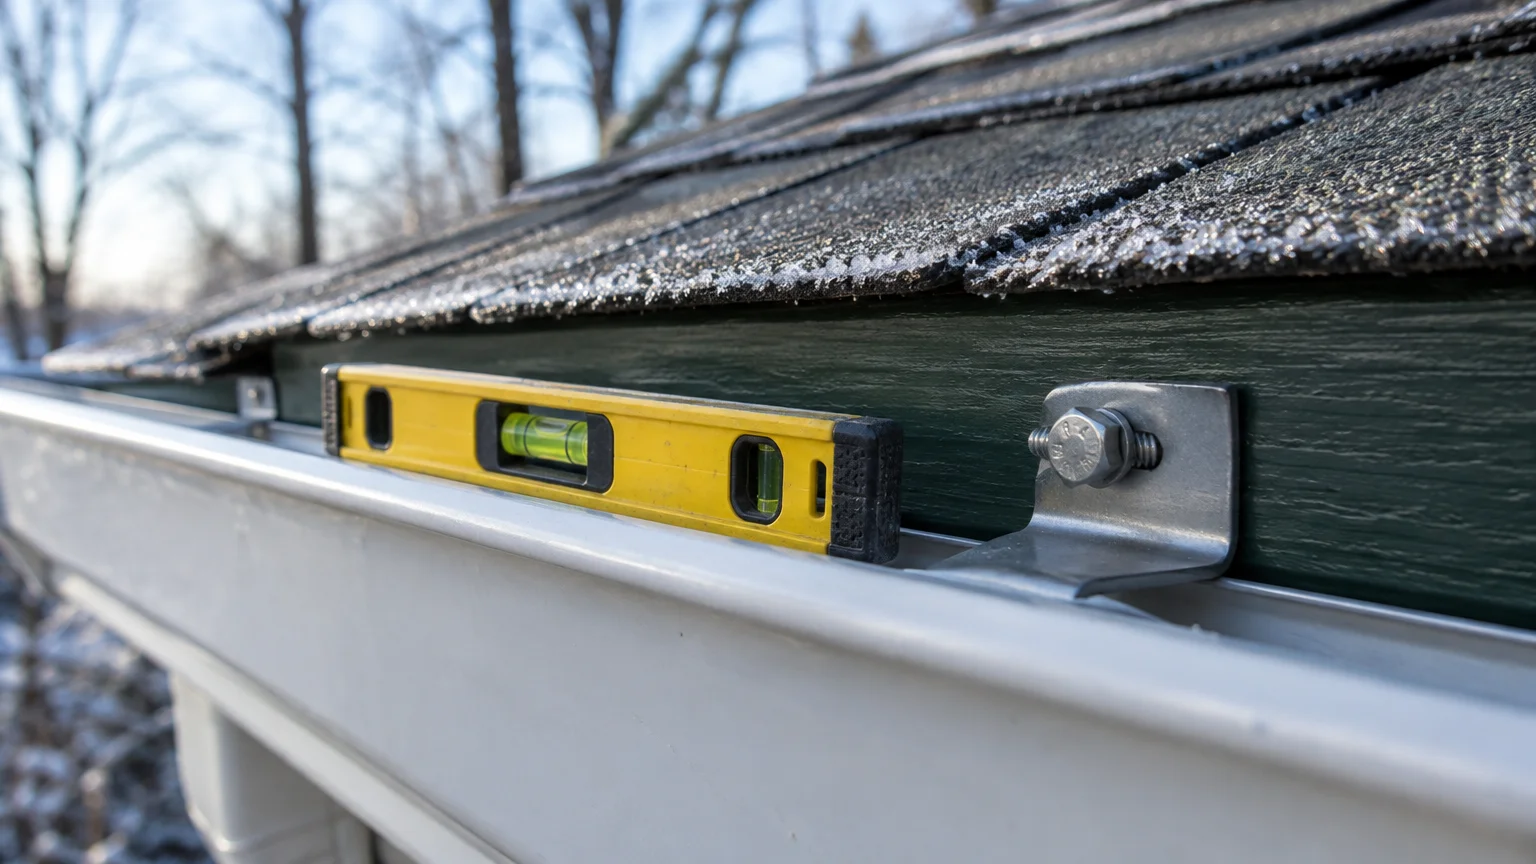
Inspect the slope of your gutters using a standard four-foot carpenter’s level along the front rim. Proper drainage requires a downward pitch of roughly one-quarter inch for every ten feet of run.
Replace old, loose gutter spikes with heavy-duty hidden screw hangers driven directly into solid rafter tails. Screw threads bite deeply into wood framing, providing superior load-bearing capacity against heavy slush.
Space new hidden hangers approximately twenty-four to thirty-six inches apart along the entire gutter run. Closer spacing prevents troughs from bowing under the weight of accumulated winter snow.
Reseal leaking corner miters and end caps with exterior-grade elastomeric gutter sealant applied to clean, dry metal. Water leaking through seams forms hazardous icicles that hang over walkways and driveways.
Tighten downspout wall straps securely against your exterior masonry or siding. Strong winter gusts can tear unanchored downspout pipes away from your home during blizzards.
Tip 8: Inspect Attic Insulation to Limit Roof Surface Heat
While clean gutters give melting snow an escape route, stopping roof heat loss prevents ice dams entirely. Escaping indoor heat warms upper roof decking, melting snow that subsequently freezes over cold eaves.
The Department of Energy recommends sealing air bypasses around chimneys, recessed lights, and plumbing stacks to stabilize attic temperatures. Adequate thermal barriers keep exterior roof surfaces uniformly cold all winter long.
As building science researchers at the University of Minnesota Extension explain, balanced soffit and ridge ventilation sweeps out escaping warmth. Maintaining unhindered airflow stops the freeze-thaw cycles that overwhelm clear gutter runs.
Check inside your attic space to confirm loose insulation does not cover soffit intake baffles. Clear ventilation paths preserve chilly roof decks and protect your gutter edges from relentless ice buildup.
Tip 9: Install Heated Cables or Temporary Strainers
In regions prone to severe freeze-thaw cycles, install self-regulating de-icing cables along vulnerable roof overhangs. Zigzag heat cables keep melted runoff flowing freely through downspout throats during freezing daylight hours.
Lay heating cables along the bottom interior of the gutter trough and downward inside the downspout pipe. This continuous thermal channel stops ice bridges from forming along critical drainage exits.
If your roof receives heavy pine needles, install stainless steel micro-mesh guards before cold rains begin. Quality guards block fine organic debris while letting torrential storm runoffs enter troughs without cascading over eaves.
Remove delicate decorative rain barrels or decorative rain chains before deep freezes arrive. Freezing water expands quickly, cracking rigid plastic barrels and warping ornamental chains under immense ice weight.

Styling and Elevating Exterior Drainage Aesthetics
Practical winter preparation also presents an opportunity to elevate your exterior architecture and curb appeal. Thoughtful design choices integrate functional water management smoothly into your home facade.
Design editors at Architectural Digest highlight how painted seamless aluminum channels accentuate exterior trim lines. Matching gutter enamel to your window casing color creates a polished, cohesive architectural frame.
For historic or farmhouse exteriors, consider half-round gutters paired with round downspouts and decorative brass brackets. Half-round profiles feature curved troughs that shed debris faster than conventional boxy K-style gutters.
If you switch from summer rain chains back to solid downspouts for winter, choose decorative fluted pipes. Fluted designs conceal minor thermal expansion stresses while adding sophisticated vertical texture to your siding.
Select durable powder-coated leaf screens that match your dark roof shingle color rather than raw aluminum. Darker tones absorb solar heat during clear winter days, assisting natural snow melt along gutter margins.
Install hinged downspout flip-up extensions painted in trim-matching shades to route discharge away from foundation planting beds. These extensions swing upright easily during winter snow removal, protecting hardware from snowblower damage.
Pair your drainage outlets with decorative stone splash blocks made of cast granite or slate. Natural stone adds handsome texture to foundation beds while dispersing forceful water streams safely across the lawn.
Troubleshooting Cold-Weather Drainage Pitfalls
Even diligent homeowners sometimes encounter surprise drainage snags when temperatures plunge below freezing. Diagnosing symptoms promptly prevents small drainage flaws from turning into catastrophic foundation leaks.
If you notice water spilling over gutters during winter rains, look for hidden blockages at the outlet collar. Leaves often mat across downspout inlets beneath clean-looking top layers of loose needles.
Sagging gutter centers indicate failed brackets or waterlogged debris pulling aluminum downward away from rooflines. Install additional hidden screw hangers every two feet across sagging spans to restore proper slope.
Seeping gutter joints reveal dried or separated caulk that contracted under sharp seasonal temperature drops. Clean the seam thoroughly with rubbing alcohol on a dry day, then apply fresh tri-polymer sealant.
Frozen splash blocks at the downspout base can cause meltwater to pool backward toward foundation walls. Extend discharge lines at least six feet away from your foundation wall using rigid, sloped piping.
Clear snow accumulations away from downspout discharge zones after every major winter storm. Snowdrifts can block downspout exits, trapping meltwater that subsequently freezes up the entire vertical pipe.
Frequently Asked Questions
What tools do I need for cold-weather gutter maintenance?
You need an extension ladder with a standoff bracket, waterproof work gloves, safety glasses, and a plastic scoop. Keep a bucket on hand for leaf collection and a plumber’s snake for clearing vertical clogs.
A garden hose fitted with an adjustable high-pressure nozzle helps flush stubborn silt from aluminum channels. A cordless drill equipped with hex bits allows you to fasten replacement brackets quickly and securely.
Can I clean my gutters after the first freeze has occurred?
Yes, but you must wait for a sunny midday window when temperatures rise above freezing. Frozen leaves stick tenaciously to aluminum, risking gouged metal if you chisel them while frozen solid.
Spraying warm water from an indoor utility sink through your hose can accelerate the thawing of frozen sludge. Avoid striking frozen gutters with hammers or heavy scrapers because brittle cold metal cracks easily.
How do I safely clear gutters on a multi-story home?
For two-story structures, use telescoping pole attachments connected to your garden hose or pressure washer from the ground. These curved wand systems let you blast debris out of high troughs without climbing towering ladders.
If you must work aloft, ensure your ladder base rests on solid, level footing away from walkways. For complex three-story homes or steep roofs, hiring a licensed and insured professional provides the safest choice.
Do gutter guards completely eliminate the need for fall cleaning?
Gutter guards dramatically reduce debris accumulation, but they still require periodic fall maintenance. Fine silt and pine needles can form blankets over screen surfaces, requiring a quick seasonal brush to ensure proper flow.
In freezing weather, guards can sometimes accelerate ice dam formation if roof runoff freezes atop the cold metal mesh. Inspect guards before winter to remove trapped organic matter and confirm clean water passage.
Protect Your Home Before the Frost Arrives
Investing a single autumn afternoon in clearing your gutters shields your home against expensive winter emergencies. Clear troughs guide melting snow safely away from your roof, walls, and foundation all season long.
Routine fall maintenance also prolongs the lifespan of your fascia boards, roof shingles, and exterior paint. Keeping moisture moving freely prevents the costly structural rot that damp winter conditions foster.
Grab your ladder and work gloves this weekend while mild temperatures and clear skies hold steady. You will enjoy total peace of mind knowing your home stands ready to face the harshest winter freeze.