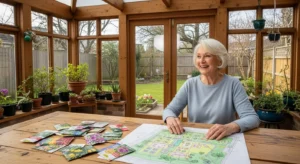
Create lasting memories and treasured heirlooms by crafting custom gifts your grandchildren will cherish for decades. Building handmade presents allows you to infuse family history, personal jokes, and tailored interests into tangible keepsakes that money simply cannot buy. Whether you have an entire weekend to spend in the garage or just a few hours at the kitchen table, these seven distinct projects span various skill levels to match your available time and tools. Handcrafted gifts forge a deep generational connection, bypassing mass-produced toys for items possessing real heart and durable craftsmanship. Let your creative energy flow into projects that bridge the generational divide and provide lasting joy.
Planning Snapshot: Budget, Timeline, and Skill Level
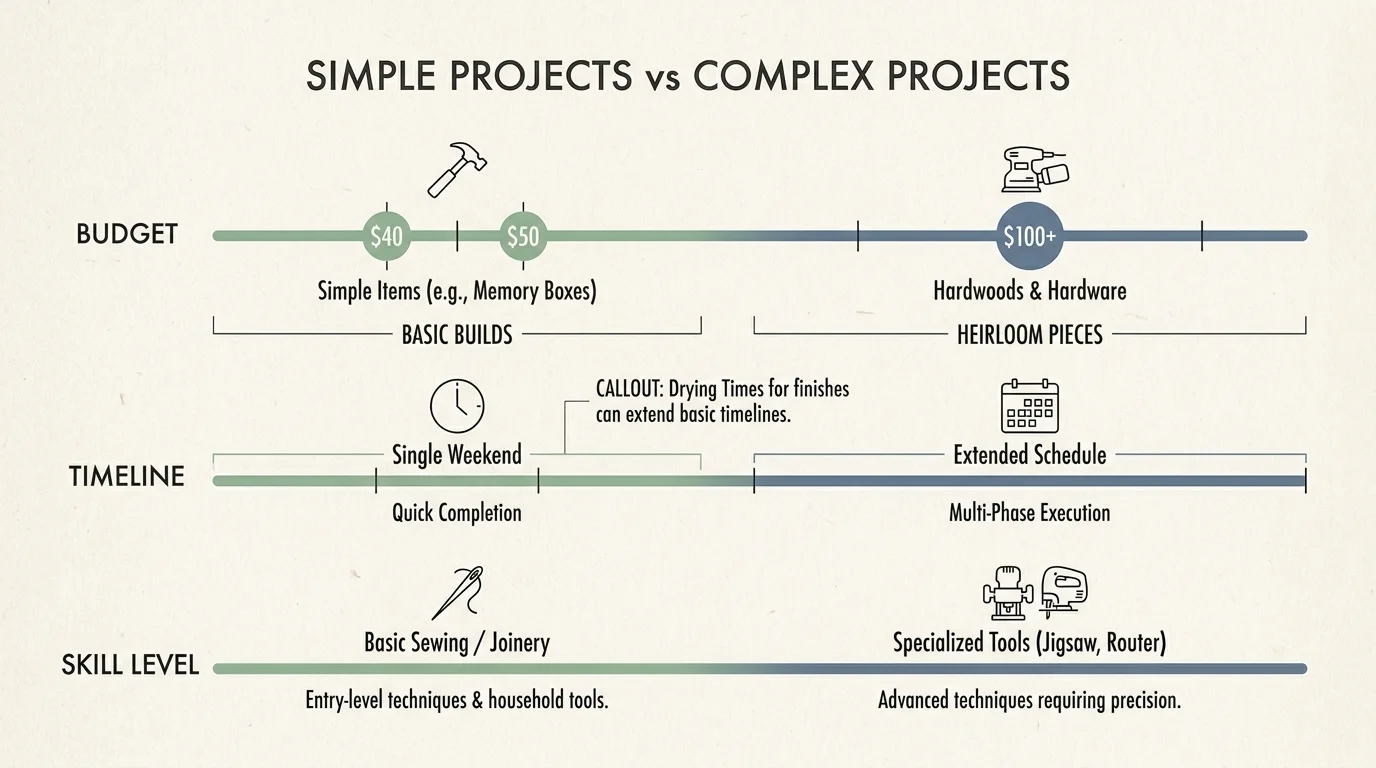
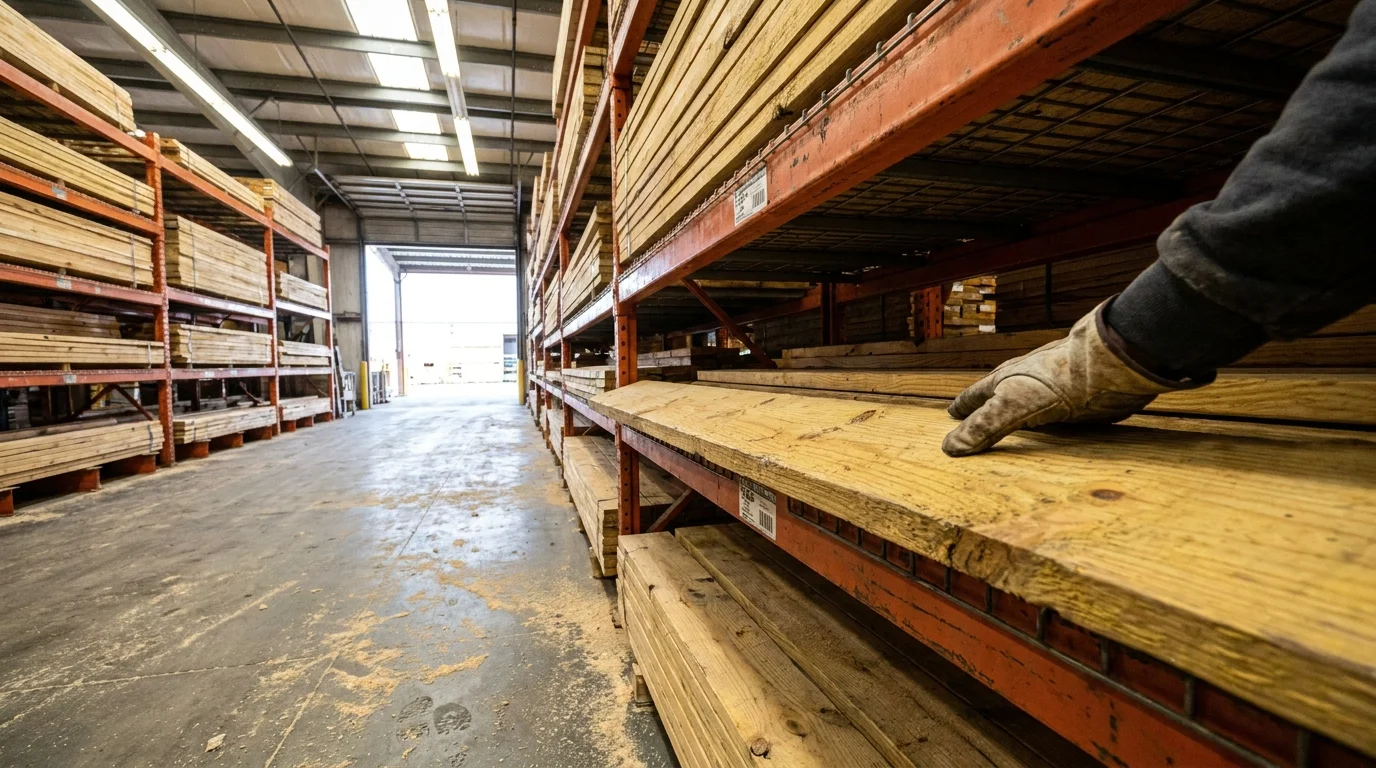
Diving into a hands-on project requires a clear understanding of your available resources, financial boundaries, and current technical abilities. You can easily construct a basic wooden memory box or a fabric storybook quilt over a single rainy weekend with a budget hovering around forty to fifty dollars. These approachable projects rely heavily on repurposed materials and fundamental skills like basic sewing or simple wood joinery. Conversely, tackling a highly detailed heirloom rocking horse or an outdoor play station demands a more generous budget, often exceeding one hundred dollars for quality hardwoods or weather-resistant hardware. Complex builds also require specialized tools like a jigsaw, router, or power sander, along with a dedicated workspace where dust and noise will not disrupt the household. Always factor the necessary drying times for wood glue, paint, and protective sealants into your master schedule; rushing a finish often leads to tacky surfaces or compromised durability. By carefully mapping out your material costs and establishing realistic daily milestones, you transform a potentially stressful undertaking into a deeply satisfying creative journey.
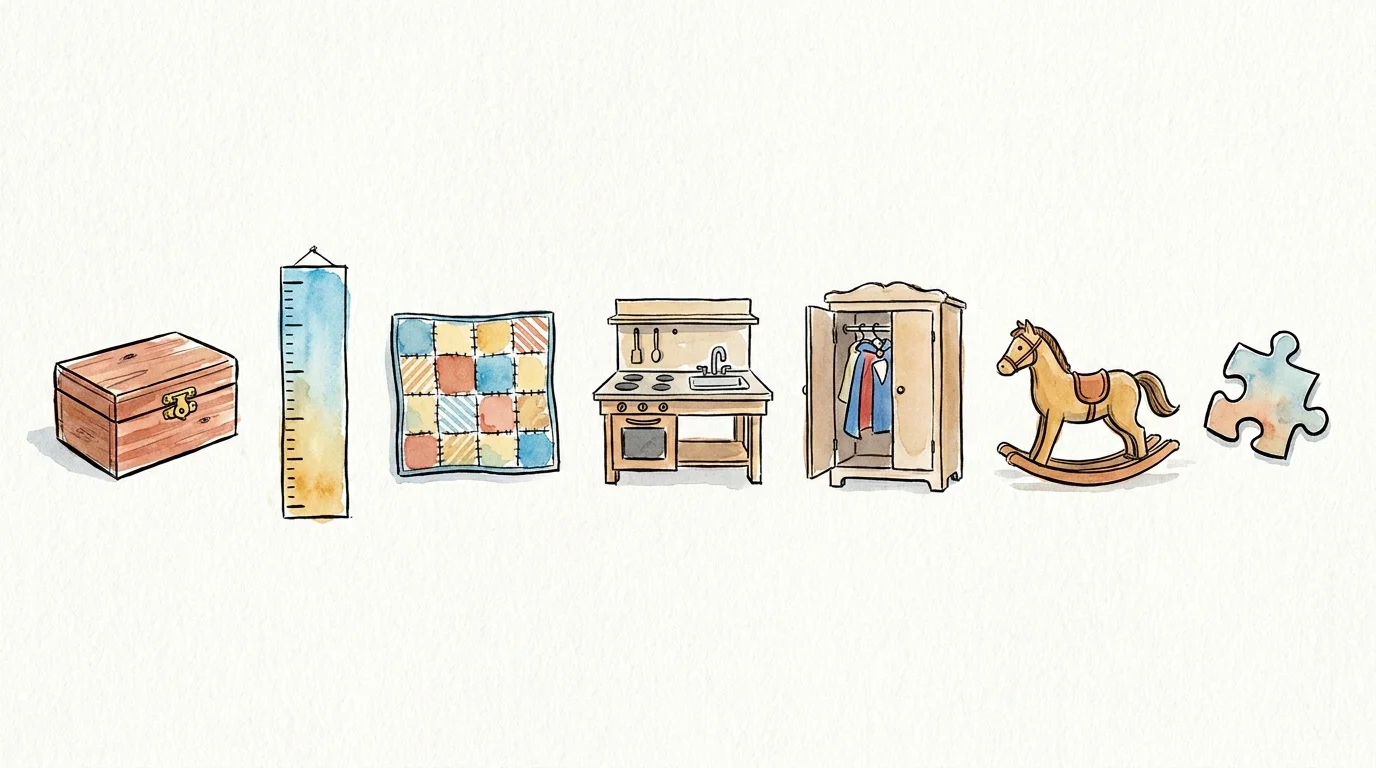
The Seven DIY Gifts to Handcraft
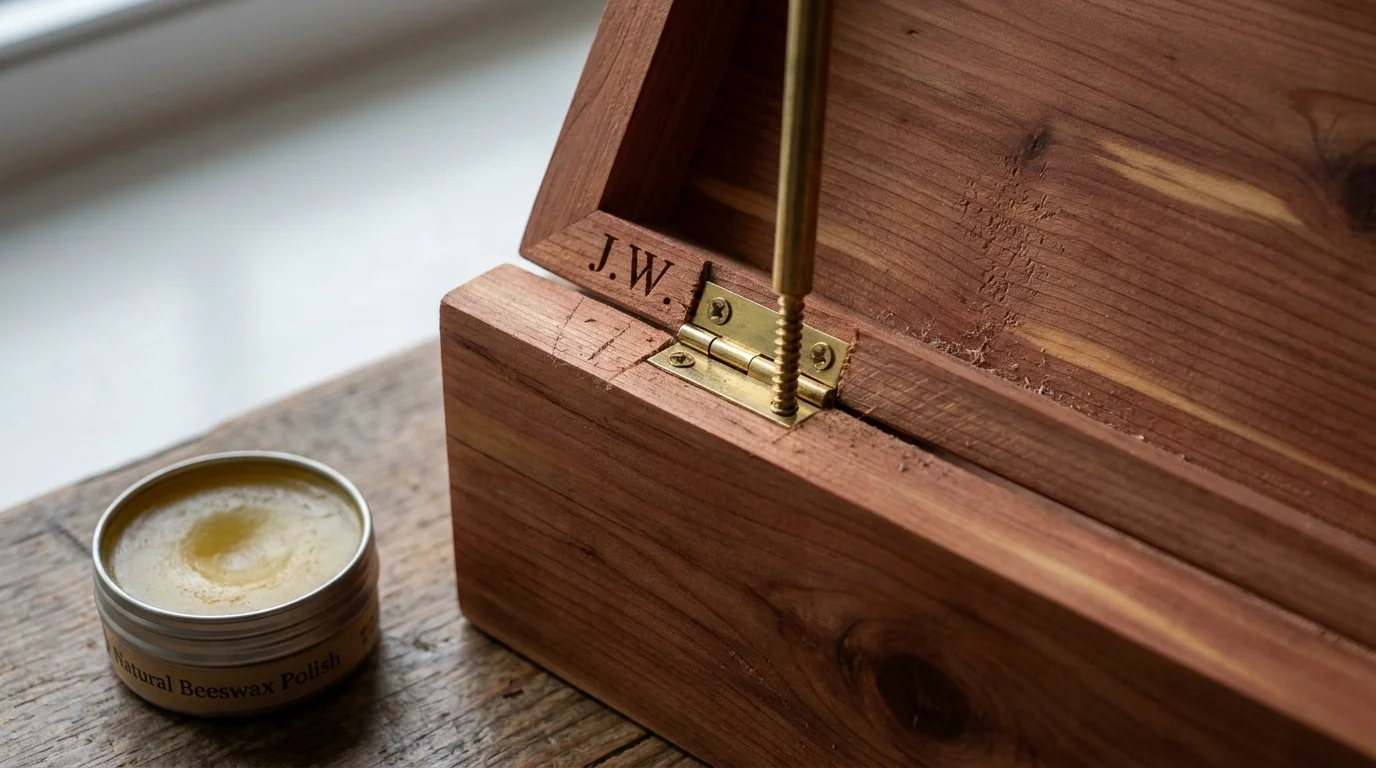
1. The Custom Wooden Memory Box
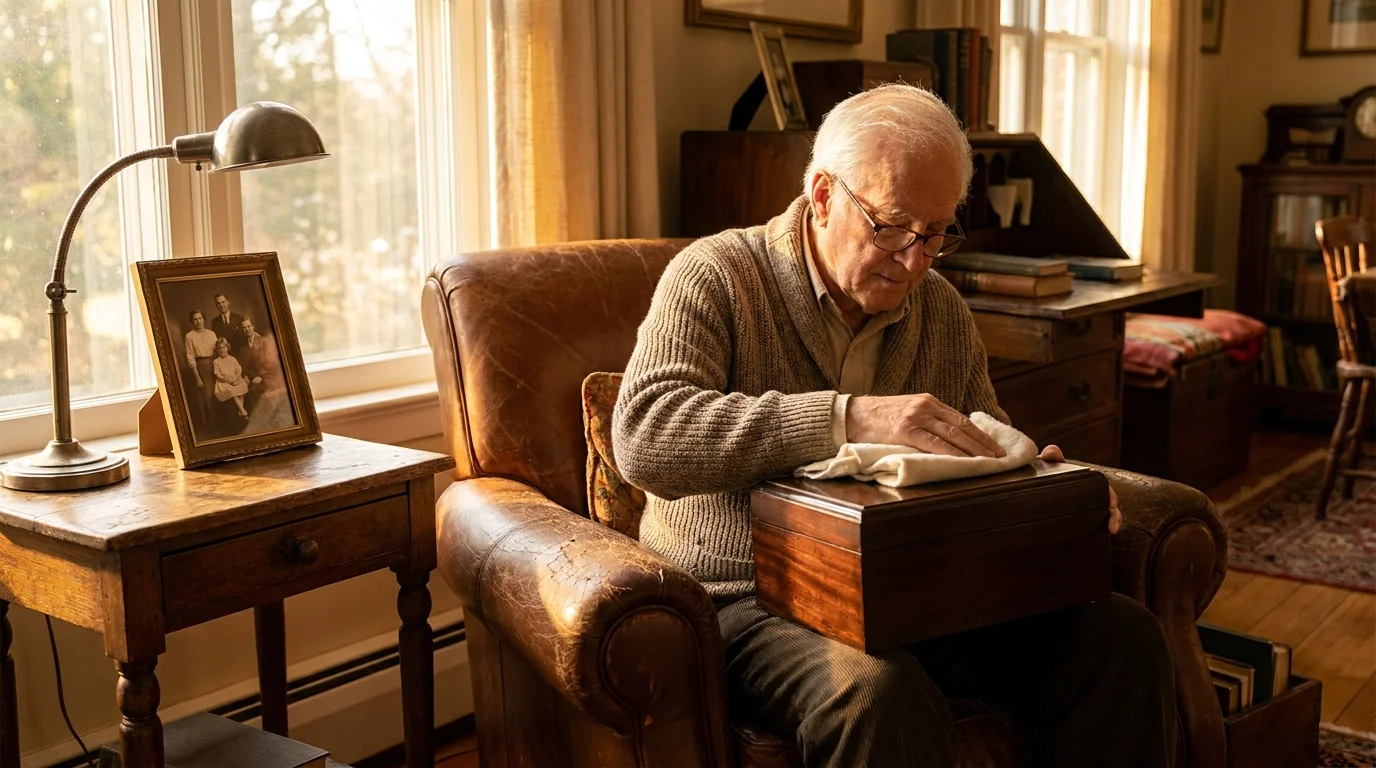
A beautifully constructed memory box offers your grandchild a personal vault for their most treasured childhood artifacts, from ticket stubs to first lost teeth. Select an aromatic wood like cedar or a visually striking hardwood like walnut to elevate the piece beyond a simple storage container. Cut your side panels to identical lengths, utilizing either sturdy dovetail joints for an advanced aesthetic or straightforward butt joints reinforced with wooden dowels for a beginner-friendly approach. Secure the bottom panel firmly with wood glue and brad nails, ensuring the interior remains perfectly flush. Attach the lid using high-quality brass hinges that provide a smooth, pinching-free closure. You can personalize the exterior by routing their initials into the top lid or using a wood-burning tool to inscribe a heartfelt message on the interior base. Finish the exterior with a natural beeswax polish to highlight the distinct grain pattern while keeping the surface completely safe for curious hands.
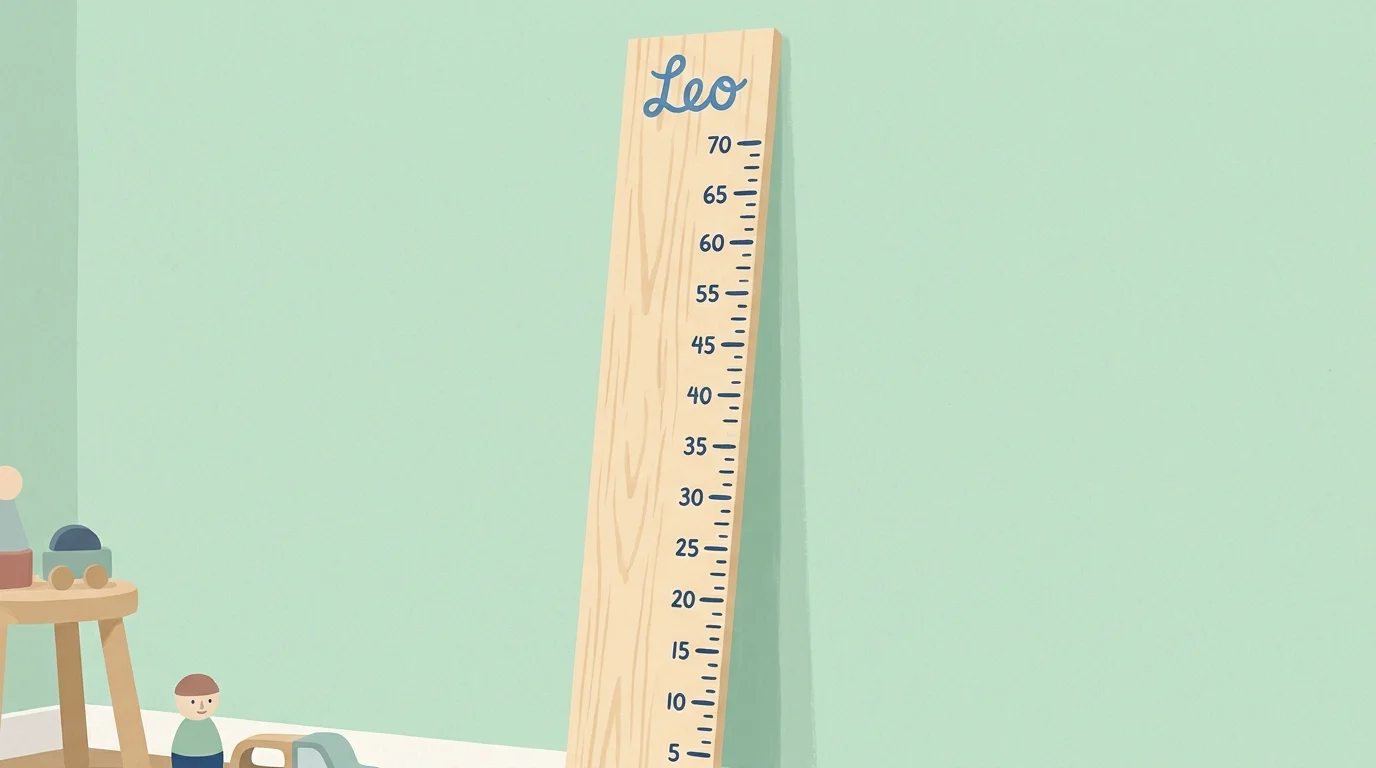
2. Hand-Painted Canvas Growth Chart
Tracking a child’s height directly on a doorframe means leaving precious memories behind if the family ever decides to move. A portable, hand-painted growth chart solves this problem beautifully while serving as a vibrant piece of room decor. Purchase a straight, defect-free piece of one-by-eight pine lumber cut to a six-foot length. Sand the entire board thoroughly to eliminate sharp edges and apply a high-quality wood conditioner before staining to ensure an even, blotch-free color base. Once the stain fully dries, use a trusty tape measure and a carpenter’s square to mark out the height increments precisely. Apply vinyl stencils or use a steady hand with acrylic paint to detail the numbers and inch markers along the edge. Personalize the header with the grandchild’s name or a whimsical phrase, and seal the entire board with three thin coats of clear polyurethane. Attach heavy-duty D-ring hangers to the back, ensuring the chart mounts securely to the wall without swinging or tilting.
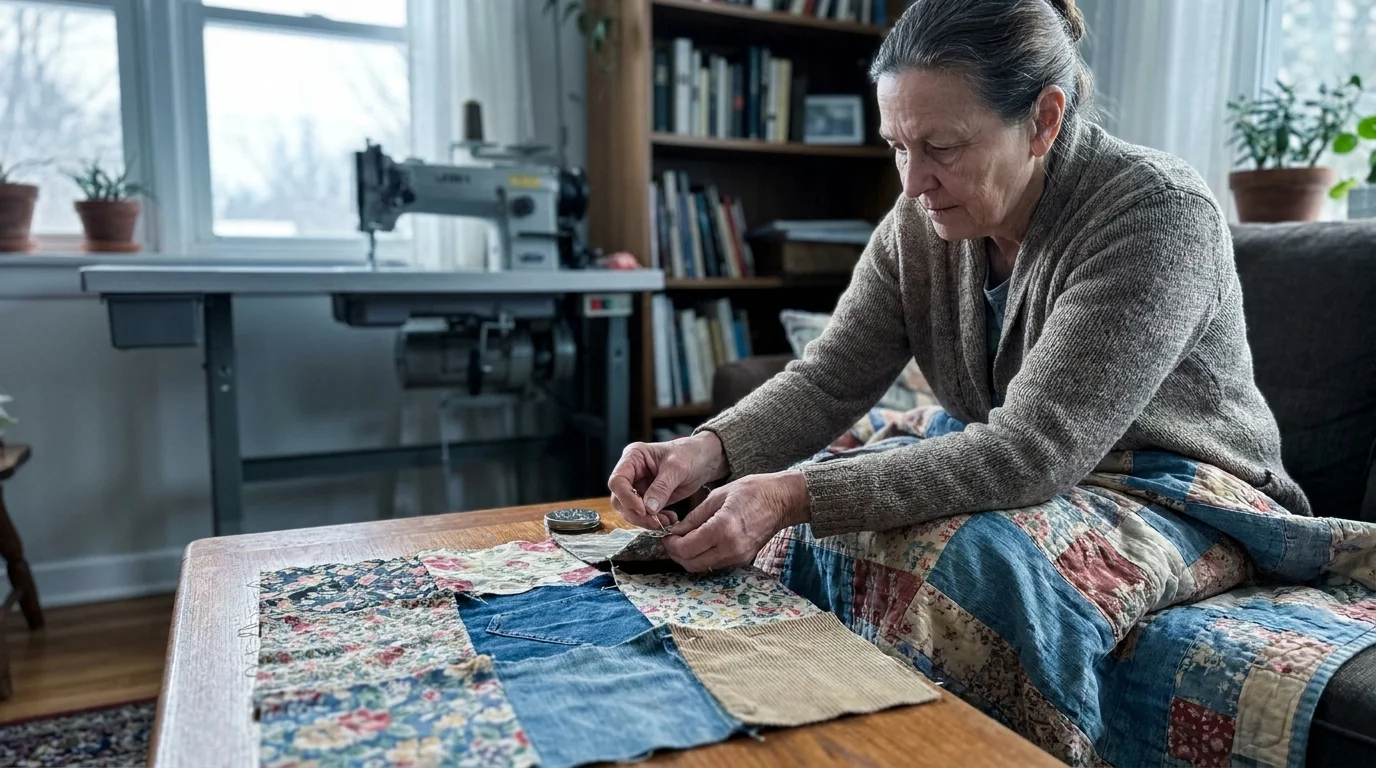
3. Upcycled Fabric Storybook Quilt
Transform outgrown baby clothes, receiving blankets, and nostalgic fabric scraps into a comforting storybook quilt that provides both warmth and sensory engagement. Begin by cutting your assorted fabrics into uniform squares, typically five by five inches, ensuring you trim away thick seams, zippers, or buttons that might disrupt the quilting process. Arrange the squares on your living room floor, balancing colors and patterns until you achieve a visually pleasing patchwork design. Sew the squares together into long rows using a quarter-inch seam allowance, pressing the seams flat with a warm iron as you progress to reduce bulk. Layer the completed patchwork top with a medium-weight cotton batting and a soft, durable backing fabric like flannel or minky. Pin the layers together meticulously before quilting them with a sturdy walking foot on your sewing machine. Bind the raw edges securely, and consider embroidering a small dedication patch in the bottom corner featuring the date and your signature.
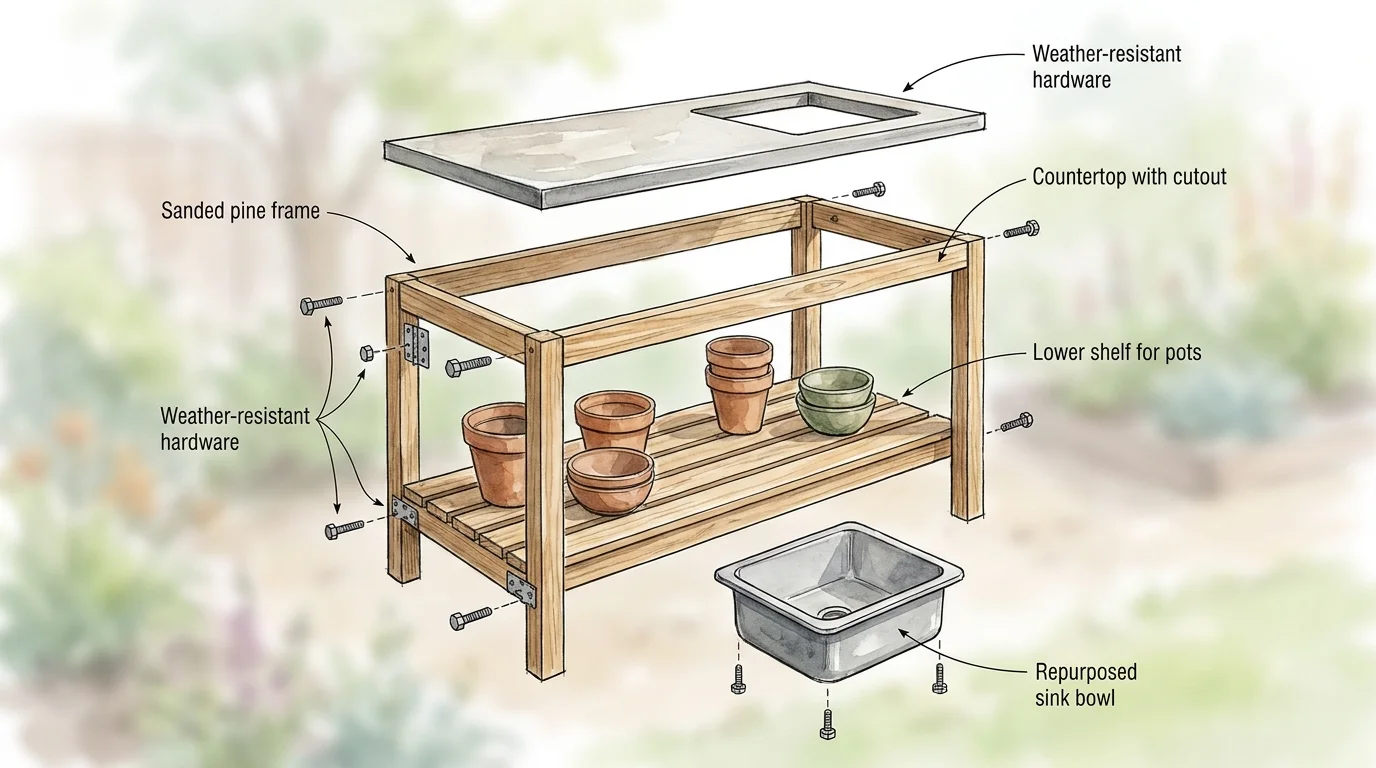
4. Backyard Mud Kitchen Station
Encourage messy, imaginative outdoor play by constructing a robust backyard mud kitchen tailored to your grandchild’s height. Source durable, pressure-treated pine or naturally rot-resistant cedar to build a simple, waist-high workbench frame. Ensure your material choices align with weather-resistant material standards to prevent premature decay and structural failure from ground moisture. Cut a circular hole into the top counter to accommodate a thrifted stainless-steel sink basin or a large, durable mixing bowl. Construct a sturdy backboard and attach several brass cup hooks to hold wooden spoons, old whisks, and small metal pots. Build a lower shelf using evenly spaced slats to store larger buckets and watering cans, allowing rainwater to drain freely. Sand every exposed surface aggressively to remove potential splinters, paying special attention to the corners and the interior rim of the sink cutout. Coat the entire wooden structure in a premium exterior deck sealant, protecting your hard work from relentless sun exposure and frequent water spills.
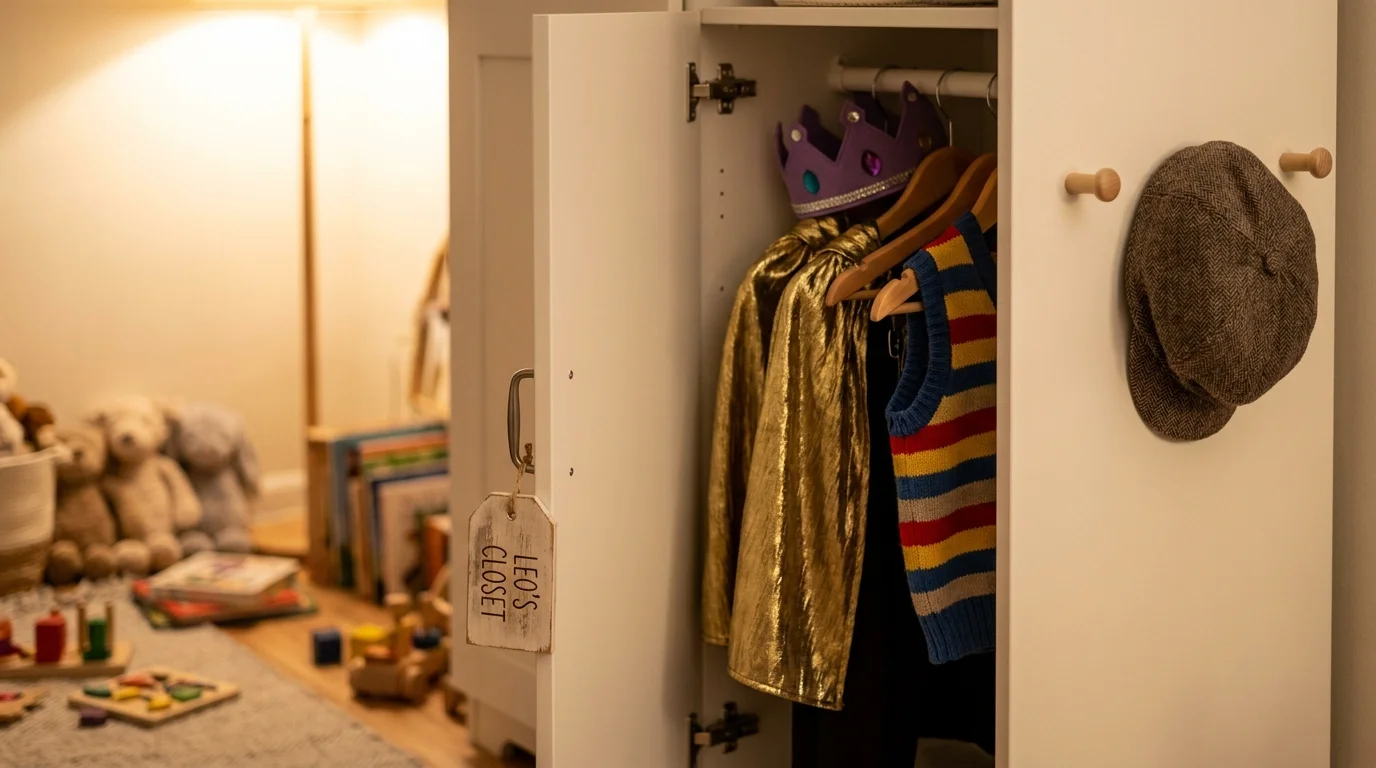
5. Personalized Dress-Up Wardrobe
Transform a cluttered pile of superhero capes and princess dresses into an organized, magical dressing station. Instead of building from scratch, you can easily adapt this project by repurposing vintage dressers or acquiring an old, sturdy bookshelf. Remove the upper shelves completely to create a spacious hanging area, and install a thick wooden dowel across the top width to serve as a sturdy closet rod. Keep the bottom shelf intact to store shoes, boots, and accessory baskets. Sand the entire unit lightly to scuff the old finish, apply a high-adhesion bonding primer, and paint the wardrobe in a bright, energetic color using durable, semi-gloss cabinet enamel. Mount a shatterproof acrylic mirror securely to one side of the cabinet, avoiding standard glass to eliminate serious safety hazards. Attach a series of decorative knobs along the exterior sides to hold hats, crowns, and heavy bags, maximizing the storage capacity of the unit.
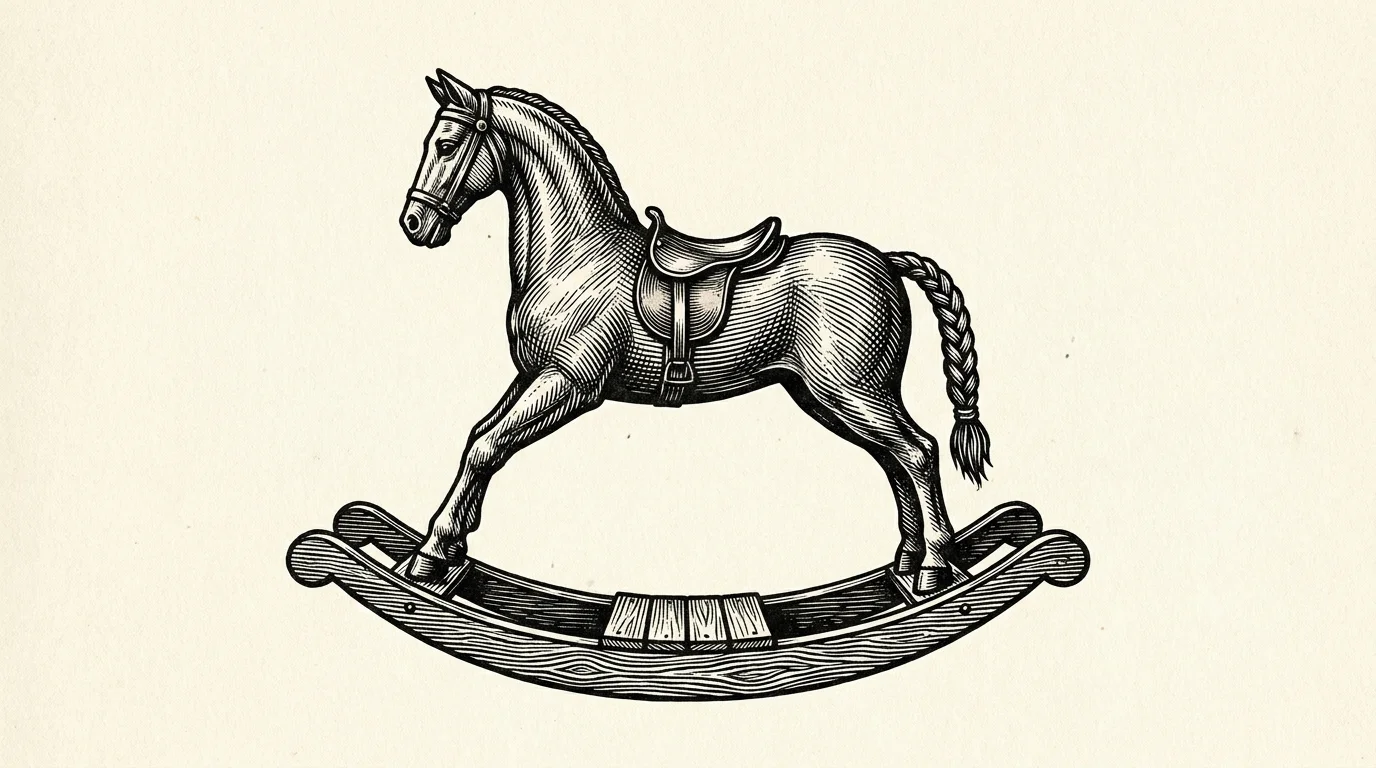
6. Heirloom Rocking Horse
Building a classic wooden rocking horse demands patience and precision, resulting in a stunning generational heirloom that commands attention in any nursery. Select a dense, durable hardwood like maple or red oak that can effortlessly withstand years of rigorous riding. Print a full-scale template and transfer the body, head, and rocker shapes onto your lumber, cutting them out meticulously using a jigsaw equipped with a fine-toothed wood blade. Assemble the pieces using heavy-duty wood glue and countersunk screws, plugging the screw holes with matching wooden dowels for a seamless, professional appearance. Design the bottom rockers with a gentle, elongated curve and a low center of gravity to prevent the horse from tipping backward during enthusiastic play. Sand the assembled horse progressively up to a smooth, two-hundred-twenty-grit finish before applying a protective topcoat. Attach a soft yarn mane and securely fasten leather strips for the reins and saddle, ensuring all hardware remains tightly flush against the wood.
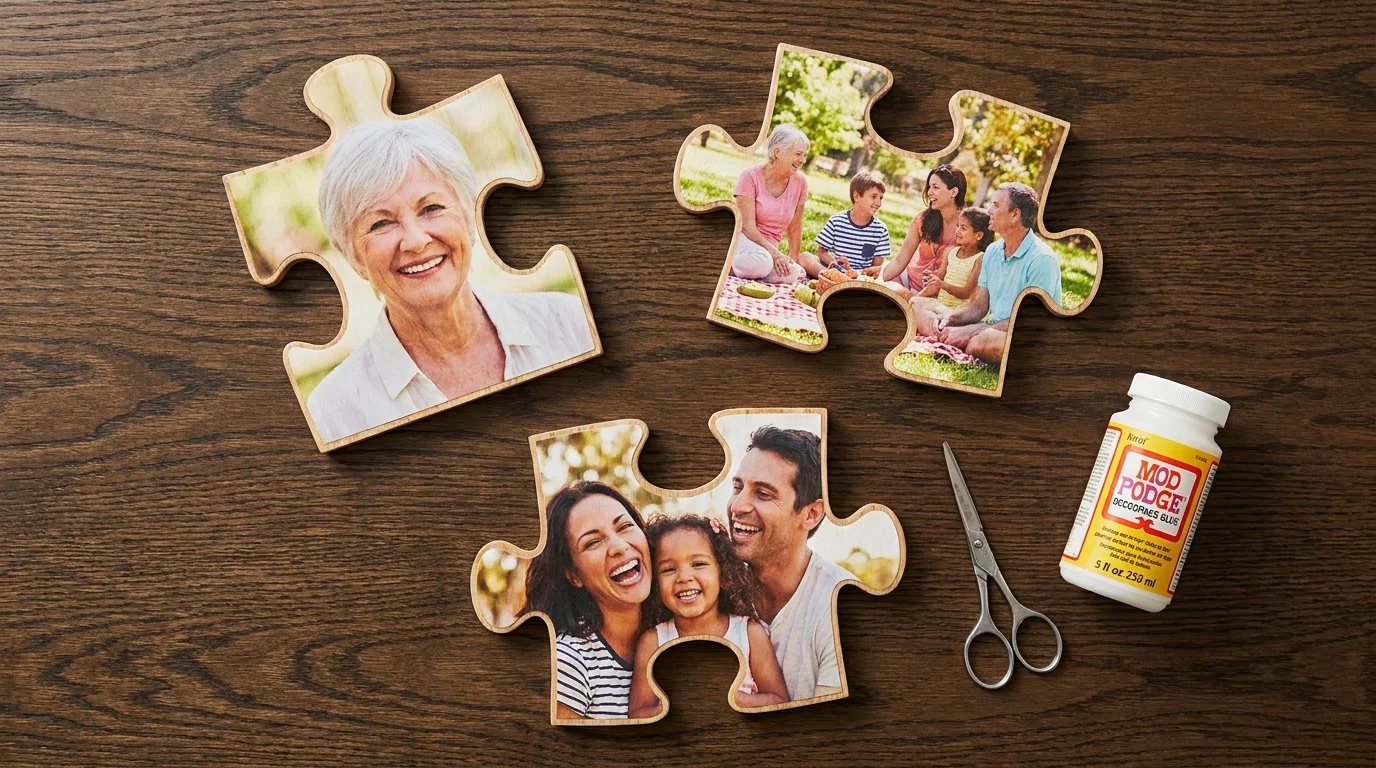
7. Family Tree Photo Puzzles
Engage your grandchild’s developing problem-solving skills while teaching them family history through customized wooden photo puzzles. Print a high-resolution, vibrant family portrait or a collage of individual faces onto heavy, archival-quality photo paper. Purchase a sheet of smooth, quarter-inch birch plywood and cut it slightly larger than your printed photograph. Apply a generous, even layer of decoupage medium like Mod Podge directly to the wood, pressing the photograph down firmly and smoothing out any trapped air bubbles with a plastic squeegee. Allow the adhesive to cure completely overnight before sealing the top of the photo with two additional coats of the decoupage medium to protect the image from sticky fingers. Utilize a fine-toothed scroll saw to cut the board into interlocking puzzle pieces, adapting the complexity and size of the cuts to match the specific age and dexterity of your grandchild. Lightly sand the back edges of each individual piece to remove any lingering tear-out or sharp splinters.
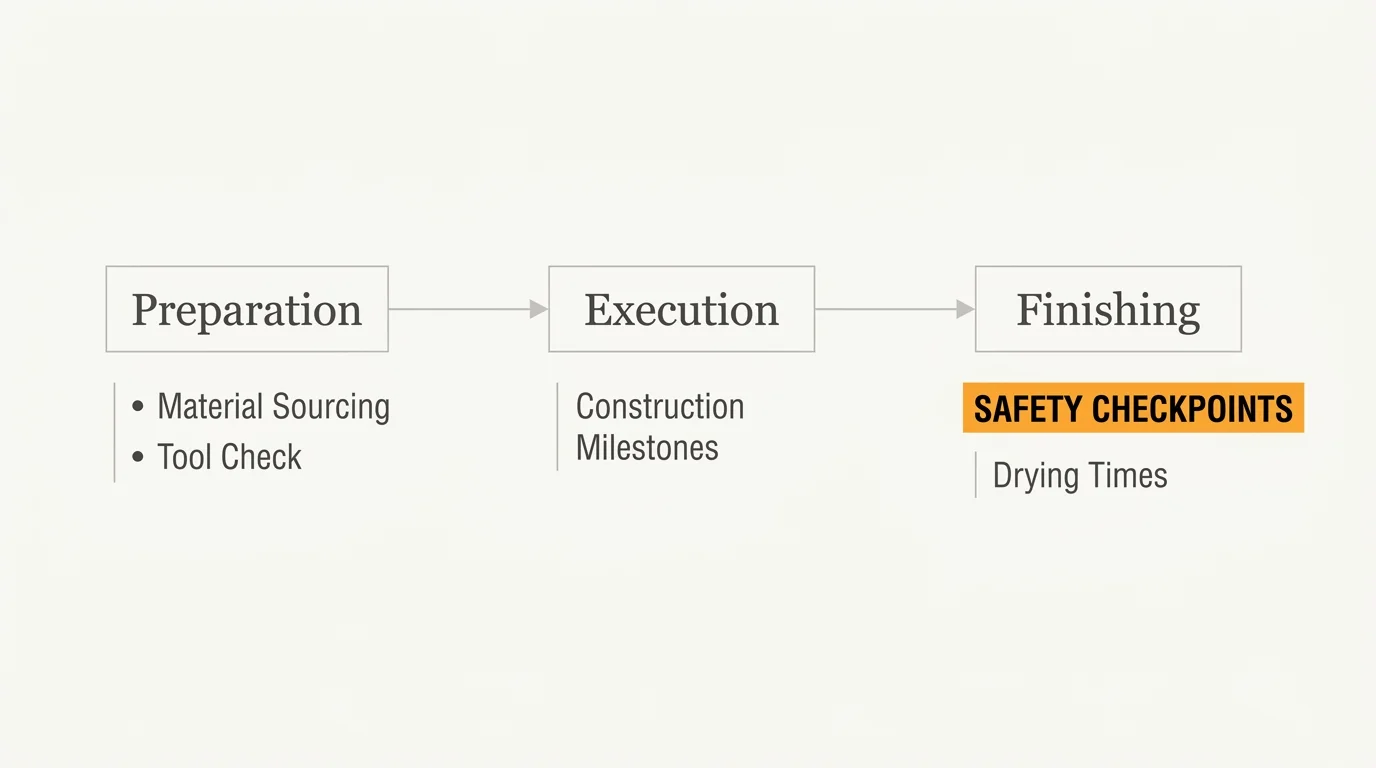
Step Framework: Bringing Your Project to Life
Preparation and Material Sourcing
Every successful build begins long before you make the first cut or sew the first stitch. Measure your designated space meticulously, create a detailed material checklist, and inspect your existing tool inventory for dull blades or missing components. Sourcing high-quality materials early prevents frustrating mid-project trips to the hardware store. Seek out lumber without heavy bowing or massive knots, and always wash and dry vintage fabrics prior to cutting to account for any shrinkage. Set up a well-lit, ventilated workspace, lay down protective drop cloths, and arrange your tools logically to keep your hands free and your mind focused purely on the creative process.
Execution and Construction
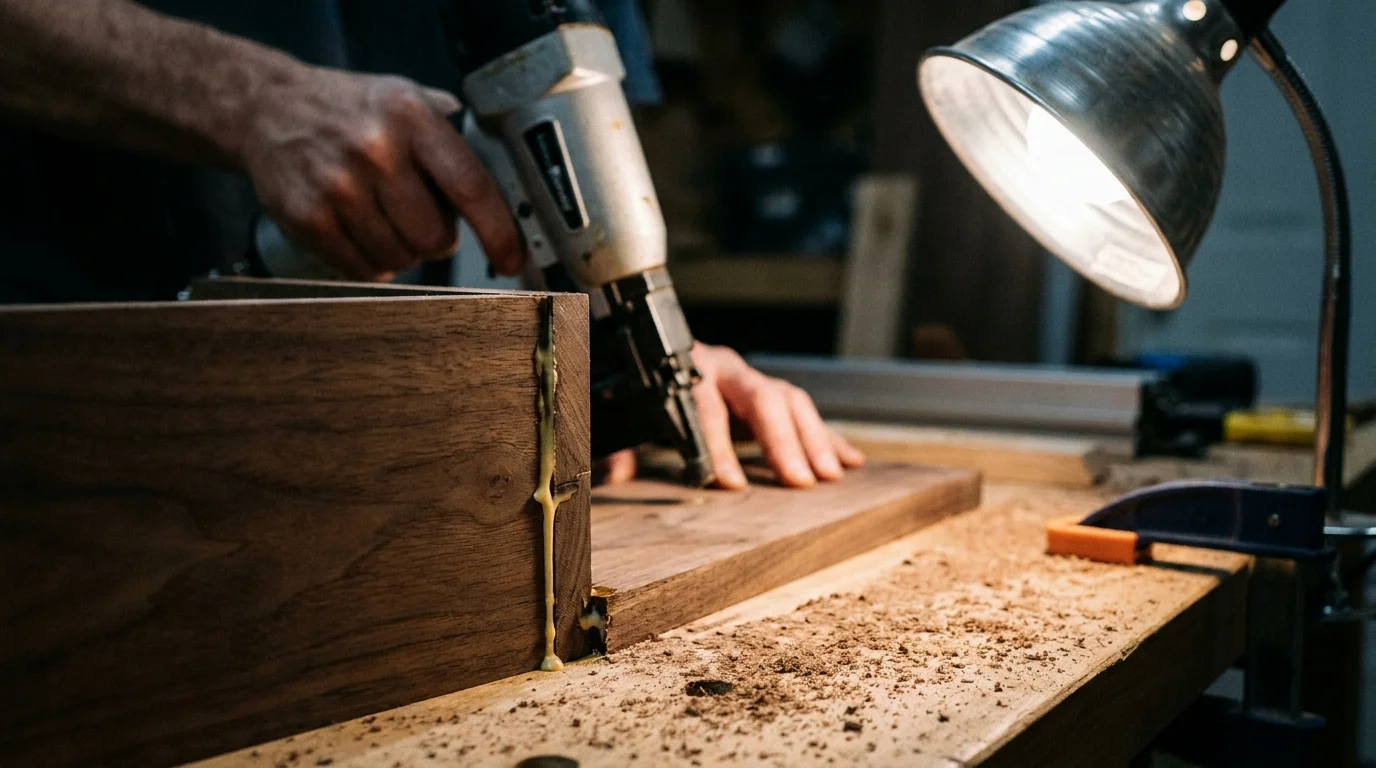
Precision and patience are your best friends during the active construction phase. Always pre-drill your screw holes when working with solid wood to prevent the boards from splitting under pressure. When applying wood glue, use an old brush to spread an even layer across the entire joint, and clamp the pieces firmly together until you see a small bead of squeeze-out emerge from the seam. If you are sewing, consistently check your thread tension on a piece of scrap fabric to avoid loose loops or puckered seams. Focus entirely on structural integrity during this phase; decorative elements can always hide minor aesthetic flaws, but nothing can hide a wobbly frame or a tearing seam.
Finishing and Safety Checkpoints
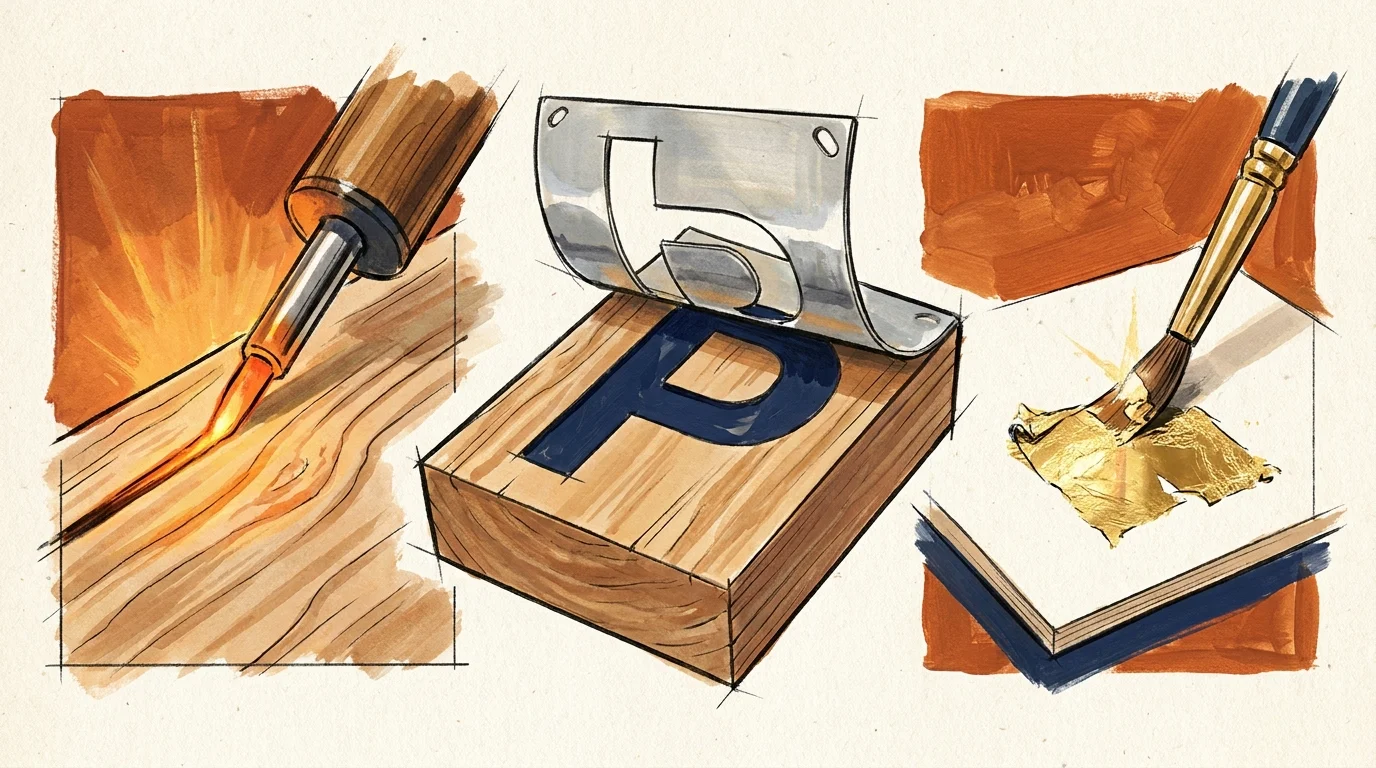
The finishing phase distinguishes a rough homemade attempt from a refined, professional-quality gift. Sanding is mandatory; progress steadily from coarse eighty-grit paper to fine two-hundred-twenty-grit paper until the wood feels as smooth as glass. Carefully inspect every inch of the project for sharp corners, protruding nails, or loose hardware that could pinch tiny fingers. When painting or sealing your project, strictly adhere to child-safe paint guidelines, opting for zero-VOC acrylics and non-toxic sealants. If the item will be used near the mouth, research proper food-safe wood finishing techniques like applying pure mineral oil or natural beeswax paste to ensure total safety.
Styling and Personalization Techniques
Transforming a functional object into a cherished gift relies heavily on thoughtful personalization that reflects your grandchild’s unique personality. Observe their current interests and preferred color palettes, but apply these themes in a way that matures alongside them. Instead of painting a wardrobe entirely in a hyper-specific cartoon theme that they might outgrow in a year, use a versatile, neutral base color and incorporate their current obsessions through easily swappable ceramic drawer knobs or removable vinyl decals. Add a hidden touch of love by stamping your initials or a short, encouraging message in an inconspicuous spot, like the underside of the rocking horse saddle or the inner lining of the quilt. Incorporating family tartans, utilizing wood sourced from an old tree on the family property, or color-matching a project to their current bedroom decor elevates the final piece from a generic item into a profound, customized treasure.
Troubleshooting and Long-Term Upkeep
Even the most meticulously crafted gifts encounter daily wear and tear from energetic children. If you notice wood joints swelling or cracking due to shifting humidity, gently sand the tight spots and reinforce loose connections with a fresh application of wood glue and longer screws. Outdoor projects like mud kitchens naturally gray and weather over time; combat this by washing the surfaces annually with a mild soap solution and reapplying a fresh coat of exterior wood sealant. For fabric projects, repair popped seams immediately using a durable zigzag stitch to prevent the internal batting from shifting and clumping during routine laundering. Educate the parents on the proper cleaning protocols for your handmade gifts, advising them to wipe down wooden surfaces with a damp cloth rather than harsh chemical sprays, ensuring the finishes remain vibrant and fully intact for younger siblings to eventually enjoy.
Frequently Asked Questions
What are the safest finishes to use on wooden children’s toys?
Safety remains the absolute highest priority when applying finishes to items that toddlers might instinctively place in their mouths. Avoid standard polyurethane or heavy varnishes for small handheld toys. Instead, utilize pure, food-grade mineral oil, natural beeswax, or pure shellac, which is derived from natural resin. These finishes penetrate the wood deeply, providing a smooth, protective barrier without off-gassing harmful chemicals or chipping off into dangerous flakes during aggressive play.
How can I source affordable lumber for larger backyard builds?
Purchasing premium lumber directly from big-box retailers quickly drains a project budget. Look for local independent sawmills that often sell discounted off-cuts or imperfect boards perfect for rustic outdoor projects. You can also dismantle wooden shipping pallets, but you must ensure they bear the “HT” stamp, indicating they were heat-treated rather than treated with toxic methyl bromide chemicals. Upcycling old, solid-wood furniture sourced from local thrift stores also provides a fantastic reservoir of cheap, high-quality wood.
What fabric type works best for a sensory or storybook quilt?
One hundred percent quilting cotton serves as the gold standard for patchwork projects due to its stability, breathability, and ease of sewing. Avoid incorporating highly stretchy synthetic materials or delicate silks unless you are prepared to stabilize them heavily with an iron-on interfacing backing. Mixing textures is wonderful for sensory development, so confidently incorporate patches of durable corduroy, soft minky, or thick flannel, provided you pre-wash all fabrics to eliminate unequal shrinkage later on.
How do I adapt a building project if I do not have a full workshop?
A lack of specialized power tools should never stop you from crafting beautiful wooden gifts. Most home improvement stores gladly cut lumber to your exact specified dimensions for a minimal fee, entirely eliminating the need for a table saw. You can successfully assemble pre-cut pieces right on your kitchen island by putting down a thick protective mat. Invest in high-quality hand tools, like a reliable Japanese pull saw, a heavy-duty ratcheting screwdriver, and a block sander, which require minimal storage space and produce very little disruptive dust.
Empower Your Generational Legacy Today
Every hour you invest in sanding a wooden edge, painting a vibrant stripe, or sewing a perfect seam translates directly into a tangible expression of your love. These handcrafted items stand in quiet, resilient defiance of a world dominated by disposable plastic, offering your grandchildren something profoundly real to hold onto. Do not let the fear of making a small mistake paralyze your momentum; minor imperfections simply prove that human hands built the object. Gather your tools, select the project that sparks your imagination the most, and begin creating a beautiful legacy piece that your family will celebrate for generations to come.