Designing neutral living rooms does not mean settling for a lifeless box; you can easily craft a dynamic, inviting space that feels entirely custom. By layering rich textures, varied architectural elements, and purposeful lighting, you will transform a standard room into a sophisticated retreat without relying on overwhelming color palettes. Neutral living room ideas thrive on subtlety and depth, whether you plan to install statement molding, upgrade your textiles, or simply rethink your current layout. Renters and homeowners alike can apply these modern neutral decor concepts over a single weekend with minimal stress. This practical guide walks you through actionable planning, styling secrets, and execution techniques to ensure your neutral home decor makes a lasting impact.

Planning Your Modern Neutral Decor Project
Before swinging a hammer or opening a paint can, you must define the scope of your room transformation. Neutral living room makeovers offer immense flexibility regarding budget and timeline. If you want a rapid weekend refresh, set aside roughly $200 to $400 for premium interior paint, painting supplies, and a few high-impact textile swaps like heavy linen curtains or woven throw pillows. For a more comprehensive overhaul—involving architectural additions, upgraded light fixtures, and a large area rug—you should budget between $1,000 and $2,500 and expect to dedicate two to three consecutive weekends to the work.
Skill level heavily dictates your approach. Beginners can easily tackle painting, swapping cabinet hardware on media consoles, and rearranging furniture to optimize traffic flow. Intermediate DIY enthusiasts can take on moderately complex tasks, such as replacing hardwired light fixtures or installing decorative wall treatments. No matter your experience level, you need a solid plan. Start by gathering fabric swatches, paint chips, and flooring samples to view them together in your actual living space. Natural light shifts dramatically throughout the day; testing your materials under morning sun, afternoon glare, and evening artificial light ensures your chosen neutral tones remain cohesive and avoid turning unexpectedly muddy or stark.
Phase One: Prepping the Space for Transformation
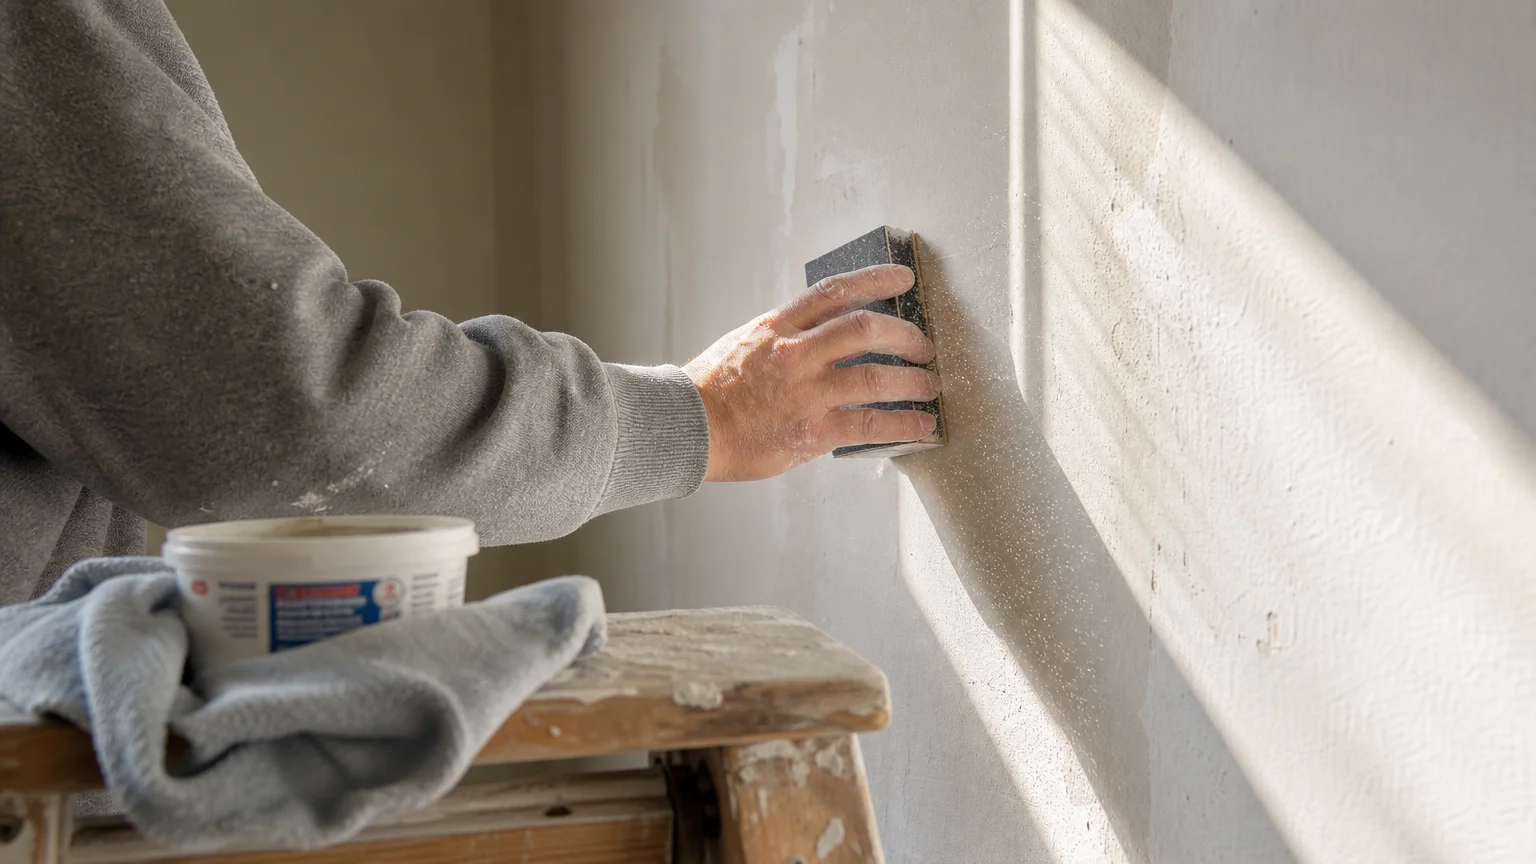
Every successful DIY project requires rigorous preparation. Begin by entirely clearing the room of small decor, rugs, and non-essential furniture. A blank canvas forces you to look at the room’s foundational architecture rather than its current clutter. Once emptied, inspect your walls for dents, nail holes, or peeling paint. Use a high-quality, lightweight spackling compound to fill imperfections, sanding the surface flush with a fine-grit sanding block once dry. Wiping the walls down with a damp microfiber cloth removes the resulting dust, ensuring your new paint adheres perfectly.
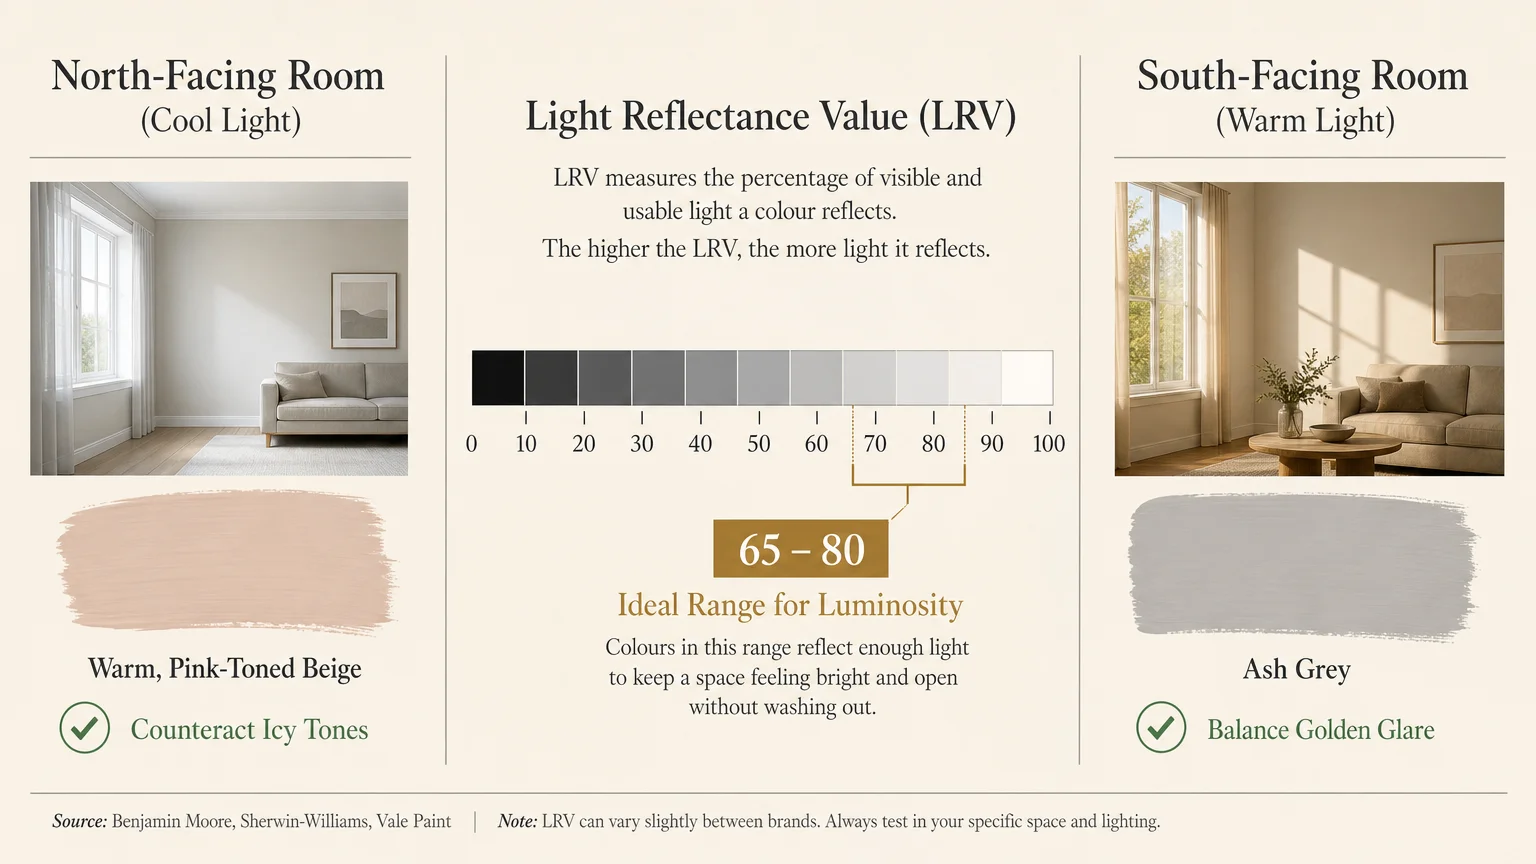
Selecting your foundational color requires an understanding of Light Reflectance Value, commonly known as LRV. This measurement dictates how much light a paint color absorbs or bounces back into the room; pure black sits at zero, while pure white sits at one hundred. For optimal living room design inspiration, target a neutral paint with an LRV between 65 and 80. This range provides a luminous, airy feel without subjecting you to the clinical harshness of a hospital corridor. Pay close attention to your room’s orientation. North-facing rooms receive cool, bluish light that can make light grays feel icy, so you should counteract this with warm, beige-leaning neutrals. Conversely, south-facing rooms bathe in warm, golden light, allowing you to successfully utilize cooler, ash-toned neutrals.

Phase Two: Executing Key Design Elements
If you want to emulate the sophistication of high-end design, you must introduce architectural interest. Flat drywall often causes neutral spaces to feel unfinished. Installing picture frame molding provides a classic, elevated aesthetic that commands attention. You can source inexpensive pine or polyurethane molding from your local hardware store. Use a miter saw to cut your trim pieces at precise 45-degree angles, creating uniform rectangular frames. Secure the trim to the wall using a brad nailer and construction adhesive. The critical step—which separates amateur work from professional craftsmanship—involves meticulously filling the nail holes with wood filler and running a thin bead of paintable caulk along every seam where the trim meets the drywall. By consulting robust installing picture frame molding tutorials, you can master this technique in a single afternoon.
After your walls cure, turn your attention upward. Standard builder-grade flush mount lights flatten a room’s aesthetic and cast harsh, unflattering shadows. Replacing your primary ceiling fixture with an oversized linen drum pendant or a structural matte black chandelier immediately grounds the space. You must also incorporate secondary lighting sources. Sconces, floor lamps, and table lamps create distinct zones of illumination, adding warmth and dimension to your neutral palette. Implement layered lighting strategies by mixing ambient, task, and accent lights to highlight your new molding and cast a soft glow across your textured fabrics.
Phase Three: Layering Textures and Finishing Touches
When studying twenty distinct neutral living rooms crafted by industry professionals, a consistent theme emerges: tactile variety prevents visual boredom. You might explore a coastal-inspired haven featuring sandy linen sofas and bleached oak floors, only to contrast it against a moodier, urban loft utilizing heavily textured charcoal limewash walls and raw concrete elements. Another variation involves a Parisian-chic approach, pairing creamy alabaster walls with intricate plasterwork and heavily antiqued brass mirrors. Whether you examine a desert modernist aesthetic—grounded in warm terracotta undertones and rich saddle leather—or a soft, organic minimalist retreat built around plush shearling chairs and pale ash wood, the sheer versatility of a neutral palette becomes obvious. Across all twenty conceptual styles, the deliberate absence of bright colors forces the human eye to appreciate the subtle interplay of shadow, light, and material quality.
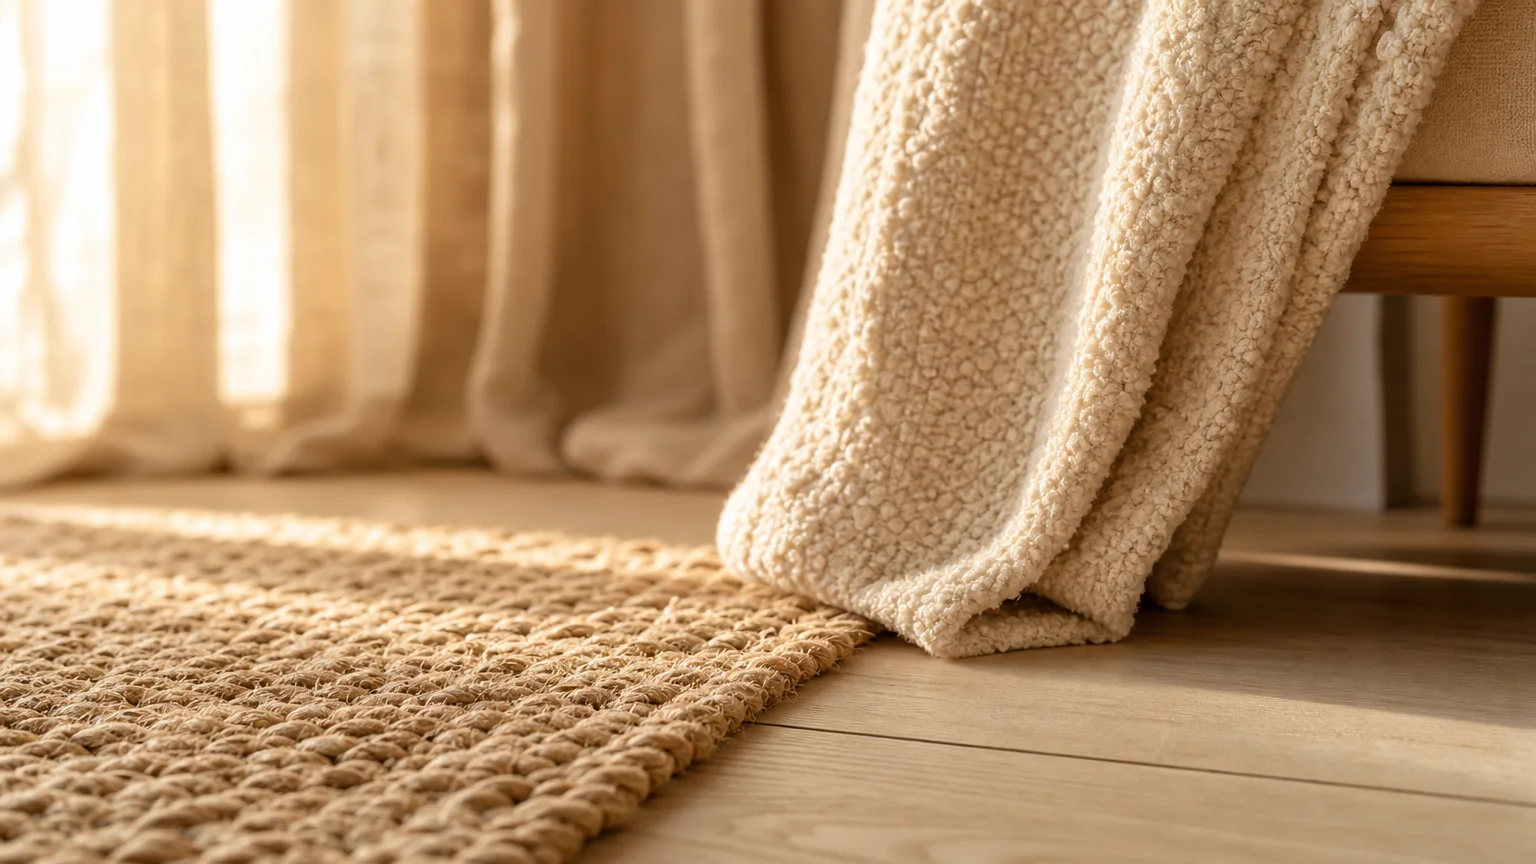
Translate these broad concepts into your home by focusing heavily on your textiles. If your sofa features a smooth, tightly woven cotton slipcover, drape a chunky, open-knit wool throw over the armrest. If your floors are slick, polished hardwood, lay down a thick, Moroccan-style shag rug or a heavily braided jute rug to anchor your seating arrangement. Incorporate varied wood finishes as well. Mixing a pale, wire-brushed oak coffee table with dark, espresso-stained side tables introduces a necessary friction that prevents the room from looking like a purchased furniture showroom set. The success of modern neutral decor relies entirely on these deliberate, highly contrasting pairings.

Styling and Personalizing Your Neutral Home Decor
Styling transforms your newly renovated space from a mere house into a personalized home. Follow a modified version of the classic 60-30-10 design rule specifically tailored for neutral environments. Dedicate 60 percent of the room to your dominant, lightest neutral—typically your walls and large upholstered pieces. Assign 30 percent to a secondary, mid-tone neutral, such as natural wood furniture, jute rugs, or woven window shades. Finally, reserve 10 percent for a dark, contrasting neutral. Touches of matte black iron, deep charcoal ceramics, or dark bronze picture frames serve as visual punctuation marks, giving the eye a place to rest.
Do not underestimate the power of organic elements. Lush, oversized greenery breathes immediate life into muted environments. A tall Ficus Audrey or an elegant Olive tree positioned in an empty corner bridges the gap between the outdoors and your interior styling. Pair your botanical additions with large-scale, abstract artwork featuring heavy impasto textures rather than flat, vibrant prints. Mixing your metal finishes further personalizes the space; contrasting warm unlacquered brass with cool polished nickel adds a layer of collected sophistication that heavily adheres to architectural design principles without requiring significant effort.
Troubleshooting Common Neutral Living Room Pitfalls
Even meticulous planners encounter hurdles during the execution phase. The most common pitfall in neutral living room design is the “waiting room” effect, where everything matches far too perfectly, resulting in a sterile, unwelcoming atmosphere. If you realize your room feels flat midway through your project, immediately introduce a drastically different texture or a high-contrast accent piece. Swap out smooth silk pillows for rugged, distressed leather options, or replace an acrylic coffee table with a heavily grained, reclaimed wood alternative.
Maintaining the pristine nature of light-colored textiles presents another significant challenge. Light beige or ivory sofas attract stains and quickly show everyday wear. Combat this by investing in high-performance fabrics, such as Crypton or solution-dyed acrylics, which inherently resist moisture and dirt. If replacing furniture falls outside your budget, purchase high-quality, washable slipcovers. Direct sunlight poses a severe threat to light fabrics, often causing irreversible yellowing and fading over time. Protect your investment by installing energy-efficient window treatments, such as UV-blocking cellular shades or heavy linen drapes, which regulate temperature while filtering harsh rays. Additionally, establish a routine cleaning schedule; vacuuming upholstery weekly and promptly treating spills using proper upholstery maintenance techniques will keep your neutral investments looking showroom-fresh for years.
Frequently Asked Questions About Neutral Living Rooms
How do I choose the right white paint for a neutral living room?
Choosing the perfect white paint requires you to identify the undertones present in your fixed elements, such as your flooring, fireplace stone, and large furniture. If your floors feature warm, yellow or orange undertones, select a creamy white paint with warm bases to create harmony. If your home features gray luxury vinyl plank or cool-toned brick, opt for a crisp white with a blue or green base. Always purchase sample pots and paint large swatches directly onto your walls, observing how the color shifts from morning sunlight to evening lamp light before committing to full gallons.
What is the best way to add warmth to modern neutral decor?
Warmth in a neutral space stems directly from natural materials and ambient lighting. Integrate elements heavily drawn from nature, such as woven rattan baskets, raw terra cotta planters, and varied wood tones. Layering textiles plays a crucial role; drape a soft alpaca throw over a linen chair, and place a thick wool rug beneath your coffee table. Swap out cool, daylight-spectrum LED bulbs for soft white or warm white bulbs—typically resting between 2700K and 3000K on the Kelvin scale—to instantly cast a cozy, inviting glow across your muted furnishings.
Can I mix gray and beige in my living room design inspiration?
You can absolutely mix gray and beige, a combination often referred to as “greige” in the design community. The secret to making this pairing work involves matching the color temperatures and utilizing bridging elements. Pair warm grays with warm beiges, avoiding cool, icy grays that will clash violently against yellow-based tans. Introduce transitional patterns in your throw pillows or area rugs that incorporate both gray and beige threads, which visually ties the two distinct neutrals together and makes the choice look entirely intentional rather than accidental.
How do renters implement these neutral home decor ideas?
Renters have numerous non-permanent options to achieve a stunning neutral aesthetic without risking their security deposit. Instead of painting or installing hardwired molding, focus on large-scale removable elements. Utilize high-quality, peel-and-stick wallpaper featuring subtle textural patterns like grasscloth or faux linen to create a feature wall. Hide unattractive, dark rental carpeting beneath massive, oversized neutral area rugs. Swap out existing window blinds for tension rods carrying heavy, floor-to-ceiling oatmeal-colored drapes, which immediately softens the room’s hard edges and creates the illusion of higher ceilings.
Elevating Your Space Today
Revitalizing your living area with a nuanced, neutral palette fundamentally alters how you experience your home daily. You now possess the strategic blueprint to navigate paint selections, install eye-catching architectural trim, and layer textures with the confidence of a seasoned designer. Do not let the fear of a blank wall delay your progress. Pick one specific phase—whether it involves patching and painting a single accent wall or sourcing new, highly textured throw pillows—and execute it this weekend. By committing to gradual, purposeful upgrades, you will slowly but surely construct a serene, meticulously crafted sanctuary that continuously inspires you.