Every successful home project requires one crucial element to succeed: pulling flawless measurements from the very beginning. Mastering your measuring tape guarantees your next custom shelf fits perfectly snug and saves you from wasting expensive lumber on bad cuts. You might think extending a metal coil is foolproof, but tiny inaccuracies compound into massive headaches and blown budgets. Countless homeowners unknowingly commit critical errors that sabotage their renovation ambitions on a daily basis. Identifying these common measuring tape mistakes transforms your workflow entirely. You will spend less time running back to the hardware store for extra materials and far more time enjoying the beautifully precise upgrades in your space.
Planning Snapshot: Setting the Stage for Success
You are about to eradicate frustrating measuring tape mistakes from your vocabulary. The timeline for this skill upgrade is immediate; it requires no extra hours on your weekend project schedule but demands a slight, deliberate adjustment in focus. Your budget remains virtually zero assuming you already own a standard tape measure, though upgrading to a durable, auto-locking model with high-contrast fractions might run you twenty to forty dollars. Skill level ranges from absolute beginner to seasoned weekend warrior, as anyone wielding a saw or a drill benefits immensely from a refresher on foundational home improvement tips. Upgrading your measuring technique empowers you to tackle complex millwork, execute sprawling floor plans, and hang expensive decor with unwavering confidence.
Phase 1: Preparation and Knowing Your Tool
Before you even approach a piece of premium plywood or pull the trigger on a power saw, you must understand the mechanical quirks of the tool sitting in your hand. Most measuring tape mistakes happen because users misinterpret the basic design features built directly into the housing.
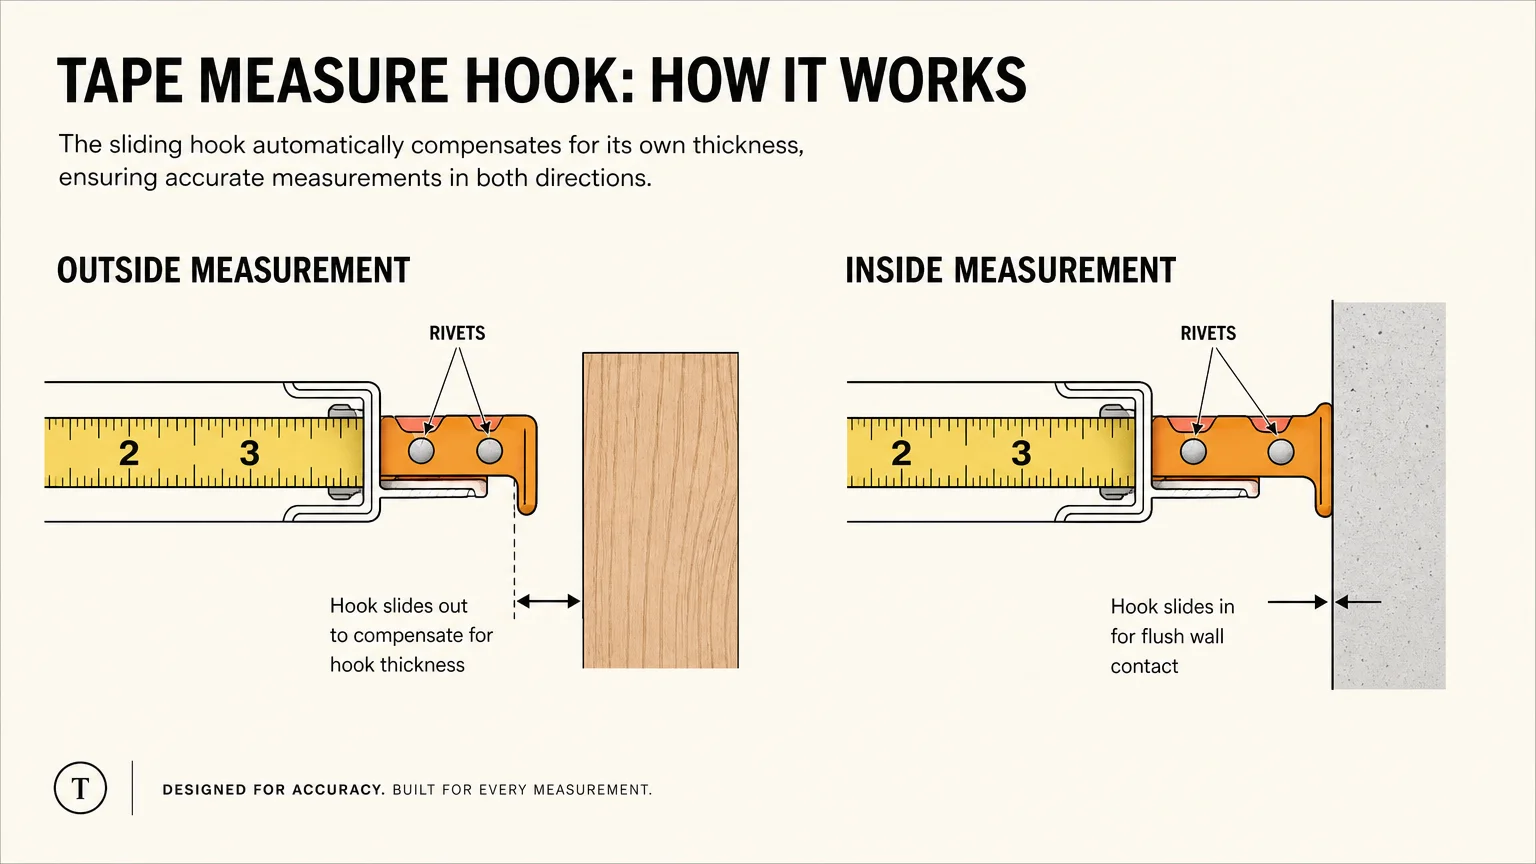
Mistake 1: Misunderstanding the Wiggle at the End
You pull a brand new tape measure out of its packaging, notice the metal hook at the end rattles loosely, and immediately assume the tool is broken. In an attempt to fix it, you grab a pair of pliers and squeeze the rivets tight. You have just destroyed the accuracy of your tape measure. That loose hook—known in the trades as the tang—is intentionally designed to shift back and forth by an exact distance equal to the thickness of the metal hook itself. This sliding action compensates for inside and outside measurements. When you push the tape against a wall for an inside measurement, the tang slides back to include its own thickness. When you pull the tape over the edge of a board for an outside measurement, the tang slides out, ensuring the zero mark sits perfectly flush with the wood edge. Leave the rivets alone and let the tang do its job.
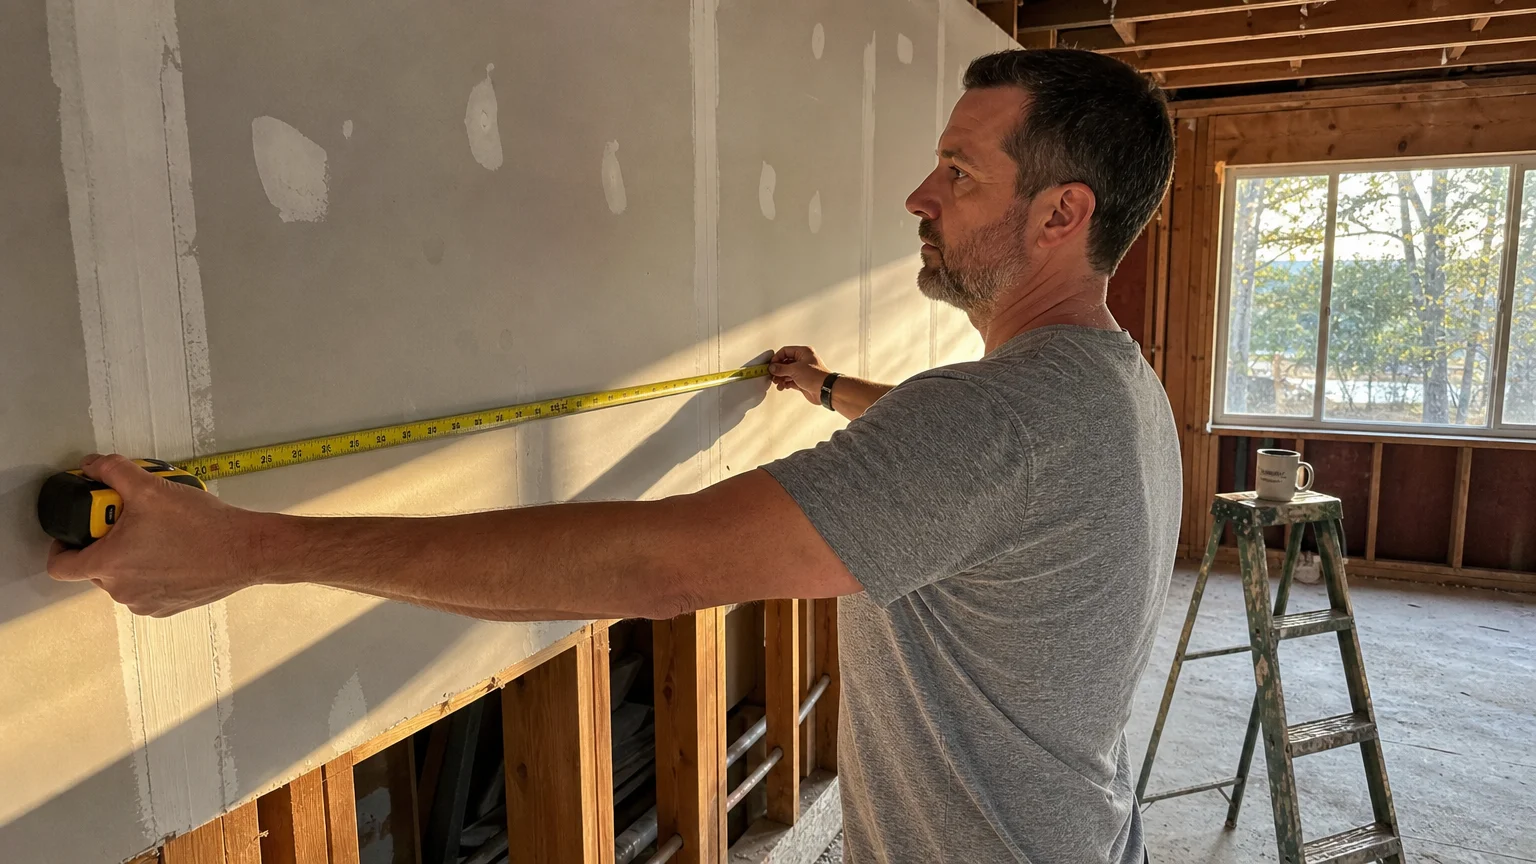
Mistake 2: Reading the Tape from an Angle
You drag your tape measure across a wide sheet of drywall, keep your head completely still, and glance over at the measurement from three feet away. This bad habit introduces parallax error into your project. Parallax error occurs when you view a measurement marking from an angle rather than looking dead-on straight. Looking from the left shifts the visual alignment to the right, and looking from the right shifts it to the left. A shift of a mere sixteenth of an inch completely ruins the alignment of tight-fitting trim or custom cabinetry. To pull accurate measurements, you must position your head so your nose points directly over the line you are reading. Leaning over your workpiece takes a few extra seconds, but it ensures your cut mark reflects reality rather than an optical illusion. You can read more about the importance of precision in layout through the fundamental framing practices shared by HGTV, which emphasize how compounding tiny errors leads to severely crooked walls.
Phase 2: Execution on the Job Site
With a firm grasp on the mechanics of your tool, you step up to your actual project. The execution phase demands focus and consistency. The way you handle the tape against physical obstacles dictates whether your materials slide into place perfectly or end up in the scrap pile.
Mistake 3: Squashing the Tape into Tight Corners
You need to measure the interior width of a window frame, so you extend the tape, push the metal tang against the left side, and forcefully bend the rigid metal blade into the 90-degree corner on the right side. You end up squinting at a curved piece of metal, guessing exactly where the bend hits the jamb. This bending method almost guarantees an inaccurate measurement. Instead of crushing the blade, you should utilize the measurement printed on the back of your tape measure housing. Every high-quality tape measure features a number stamped on its case—often 3 inches or 3 and 1/4 inches. Push the flat back of the tape housing against the right corner, extend the blade until the tang hits the left corner, and lock the tape. Read the number on the blade and add the length of the housing. This technique delivers an exact, mathematically perfect inside measurement without ever bending the metal.
Mistake 4: Ignoring Tape Sag Over Long Distances
When you measure a span longer than six or seven feet, gravity aggressively pulls the metal blade down toward the floor. Many DIYers stretch a tape measure across an entire room without supporting the middle, unknowingly pulling extra length to compensate for the sweeping bow in the center. Tape sag easily adds an eighth of an inch to your reading, a discrepancy that destroys the tight fit of baseboards or crown molding. When working alone over long distances, keep the tape pulled extremely taut to eliminate the bow. If you are measuring for critical insulation projects, consider reviewing the guidelines provided by the Department of Energy for weatherstripping, as even minor gaps caused by sagging tape measurements drastically reduce the energy efficiency of window casings and door frames.
Mistake 5: Relying on Memory Instead of Writing It Down
You measure a complicated recessed alcove, pull a number like 47 and 5/8 inches, mutter it under your breath, and walk out to your garage to make the cut. By the time you pick up your saw, you cut the board at 45 and 7/8 inches. Transposing numbers or completely forgetting fractions happens to everyone who relies on short-term memory during physical labor. You must establish a rigid habit of writing measurements down immediately. Keep a small notepad in your pocket, or attach a piece of rough masking tape to the side of your tape measure housing to serve as a convenient, erasable whiteboard. Taking three seconds to write down the exact fraction prevents you from making expensive trips back to the lumberyard.
Phase 3: Finishing and Marking
Pulling the correct number represents only half the battle. Transferring that precise number onto your workpiece requires specific techniques. Poor marking habits instantly erase all the careful measuring you accomplished just moments before.
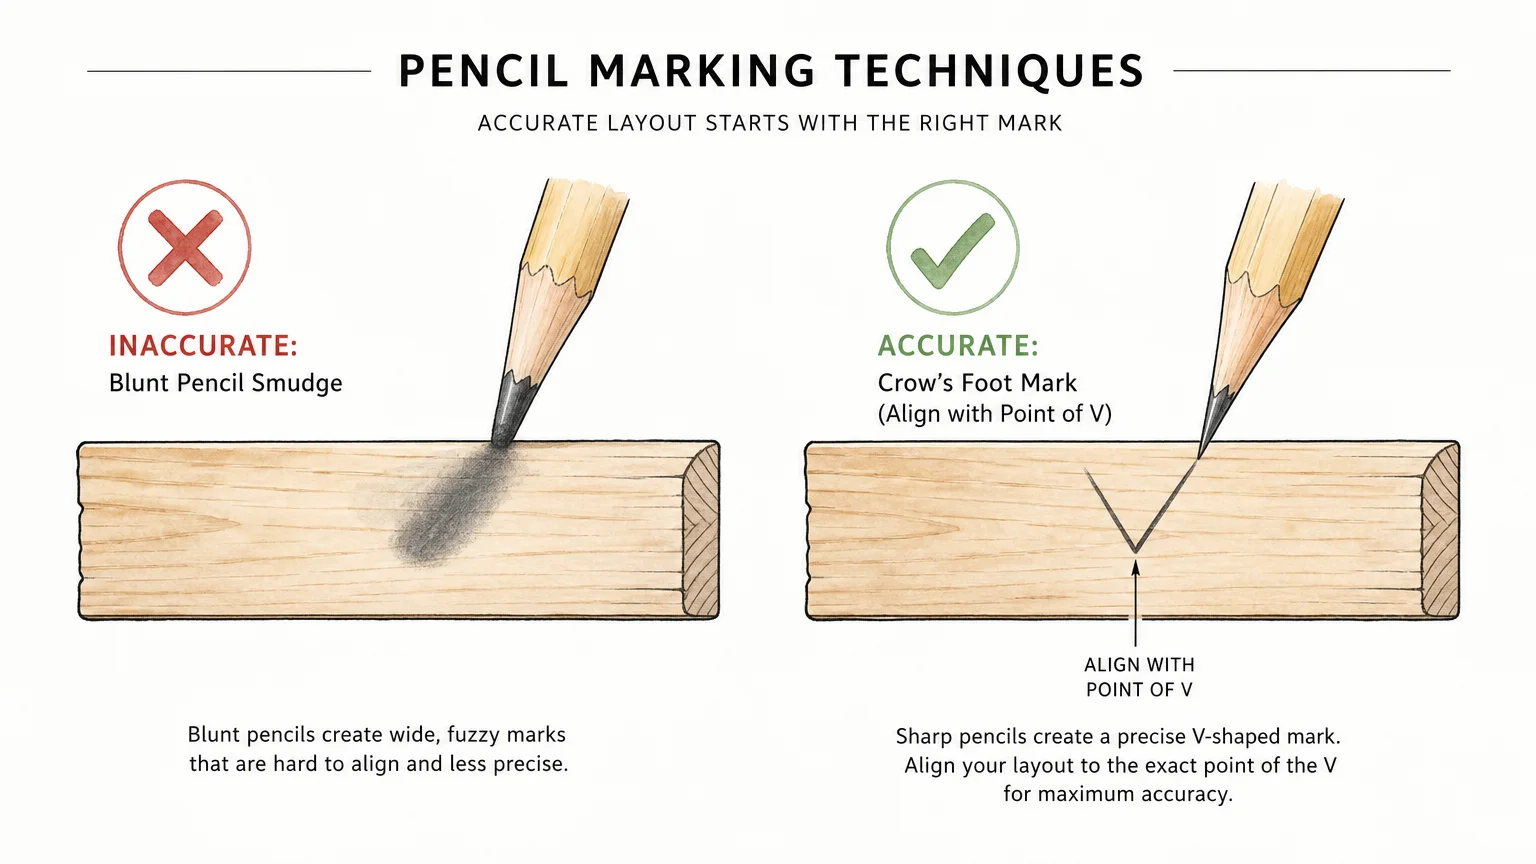
Mistake 6: Marking with Dull or Inappropriate Instruments
You carefully align your measuring tape on a gorgeous piece of solid oak, reach into your pocket, and pull out a dull, thick carpenter pencil or a standard permanent marker. You draw a thick smudge across the wood at your desired length. A dull pencil lead measures over a sixteenth of an inch wide. When you take that board to the miter saw, you have absolutely no idea whether to cut on the left side of the smudge, the right side, or directly down the middle. Ditch the thick markers for precision work. Use a mechanical pencil with a fine lead or a dedicated marking knife. Furthermore, stop drawing single dashes. Instead, draw a crow’s foot—a tight V-shape where the sharp vertex perfectly points to your exact measurement. This gives your saw blade a definitive, undeniable target.
Mistake 7: Allowing the Tape to Snap Back Uncontrollably
You finish your layout, release the thumb lock, and let the metal blade whip back into the housing at maximum velocity. The heavy metal tang slams against the plastic case with a loud, aggressive crack. Doing this repeatedly bends the tang, snaps the delicate internal spring, and permanently throws your true zero calibration off by a fraction of an inch. Treat your measuring tape like a precision instrument. Place your index finger lightly against the bottom of the blade as it retracts, applying gentle friction to control the speed. You want the tang to bump softly against the housing. Taking care of your equipment directly influences the quality of your work. You can find excellent safety and hand tool maintenance documentation from university extension services, which extensively detail how properly maintained tools prevent dangerous kickbacks and costly project failures.

Styling and Personalization: Measuring for Impact
Accurate measurements dictate far more than just structural framing; they serve as the invisible backbone of high-end interior styling. When you observe a perfectly balanced living room, you are actually looking at the result of meticulous measuring. Centering a dining table beneath a modern chandelier requires knowing the exact midpoint of your ceiling layout. Mounting custom drapery high and wide to make windows appear larger relies on pulling perfectly level, symmetrical measurements on both sides of the casing. Even hanging art benefits from technical precision. If you want to replicate the flawless, curated gallery walls seen in luxury magazines, check out Architectural Digest’s guide to hanging art, which emphasizes measuring uniform gaps between frames to create a cohesive visual narrative. Your measuring tape is the ultimate design tool; using it correctly ensures your aesthetic vision translates accurately from your imagination onto your walls.
Troubleshooting and Upkeep: Caring for Your Tape Measure
A neglected tape measure quickly becomes a liability on the job site. If your blade sticks, jams, or refuses to retract smoothly, it is likely coated in a thick layer of sawdust, drywall powder, and natural oils from your hands. Troubleshooting a sluggish tape measure requires a gentle touch. Pull the blade out completely and wipe it down with a clean, dry microfiber cloth. If the blade feels gritty, apply a very light mist of dry silicone spray to the cloth and wipe both sides of the metal. Never use heavy penetrating oils or thick lubricants; these substances turn the inside of the housing into a sticky trap that catches dirt and rapidly accelerates rusting. If you drop your tape measure onto a hard concrete floor and bend the metal tang, do not try to hammer it back into a 90-degree angle. Bending stressed metal compromises the sliding push-pull calibration permanently. A bent tang means it is officially time to retire the tool to rough yard work and purchase a new, highly calibrated replacement for your crucial indoor finishing tasks.
Frequently Asked Questions
Should I invest in a laser measure for my home projects?
Laser measures provide incredible value for specific scenarios, primarily when you need to calculate square footage for flooring, determine paint volumes, or check ceiling heights quickly without a ladder. They excel at mapping out large, empty spaces. However, a laser measure cannot replace a traditional metal measuring tape for carpentry or trim work. Lasers cannot hook onto the edge of a board, nor can they help you mark a cutline smoothly across a sheet of plywood. Keep your standard tape measure for cutting materials, and use a laser measure for planning room layouts.
What do the black diamonds on the tape mean?
As you extend your tape measure, you will notice small black diamonds or triangles printed exactly every 19.2 inches. These specific markings help builders layout engineered floor joists. Traditional lumber framing places studs every 16 inches on center, which is why the 16-inch marks usually feature bright red backgrounds. Engineered I-joists are stronger and can be spaced slightly further apart. Placing five engineered joists every 19.2 inches covers exactly eight feet, which perfectly supports standard sheets of plywood subflooring. For basic DIY projects, you can safely ignore the black diamonds and stick to the red 16-inch stud markings.
Why do my measurements always seem a sixteenth of an inch off when I cut?
If you measure perfectly, draw a sharp line, and your board still ends up too short, you are likely forgetting to account for blade kerf. The kerf is the width of the actual saw blade itself, which typically measures an eighth of an inch thick. When the saw blade passes through the wood, it turns that eighth of an inch of material into sawdust. If you align the dead center of the saw blade directly over your pencil line, you effectively delete half the width of the blade from your final measurement. You must always align the edge of the saw blade to the waste side of your pencil line, leaving the drawn mark entirely on the piece of wood you intend to keep.
How do I read the tiny lines between the inch marks?
Reading a standard imperial measuring tape requires basic fraction recognition. The longest line represents the full inch. The second-longest line sitting directly in the middle marks the half-inch. The lines slightly shorter than the half-inch mark the quarter-inches (1/4 and 3/4). The next tier down represents eighths, and the shortest lines on a standard tape represent sixteenths. When measuring, find the nearest large fraction you recognize, count the tiny sixteenth marks past it, and add them up. With just a few hours of practice on a weekend project, reading sixteenths becomes second nature.
Your Next Masterpiece Awaits
Eliminating these common measuring tape mistakes removes the anxiety from your weekend projects and drastically elevates the quality of your craftsmanship. You no longer have to settle for crooked picture frames, wobbly shelves, or baseboards crammed together with heavy caulking to hide ugly gaps. By respecting the loose tang, looking dead-on at your marks, and drawing sharp, deliberate lines, you take total control over your materials. Grab your tape measure, examine the blade with a fresh perspective, and start planning your next room upgrade. The precision you need to build a beautiful, custom-fitted home is already resting in the palm of your hand.