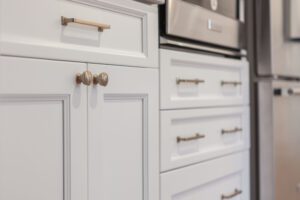
Handcrafted presents deliver an emotional impact that store purchases simply cannot match, saving you money while showing your loved ones you truly care. You can easily create display-ready items using inexpensive supplies you already have tucked away in your crafting stash or kitchen pantry. This guide breaks down seven sophisticated projects that look high-end but cost next to nothing to produce. By mastering these approachable techniques—from pouring custom botanical candles to sculpting minimalist clay dishware—you will build your maker skills and finish your shopping list. Each handmade piece requires minimal time investment, ensures a low environmental footprint, and provides a stunning personalized result that friends will treasure forever.
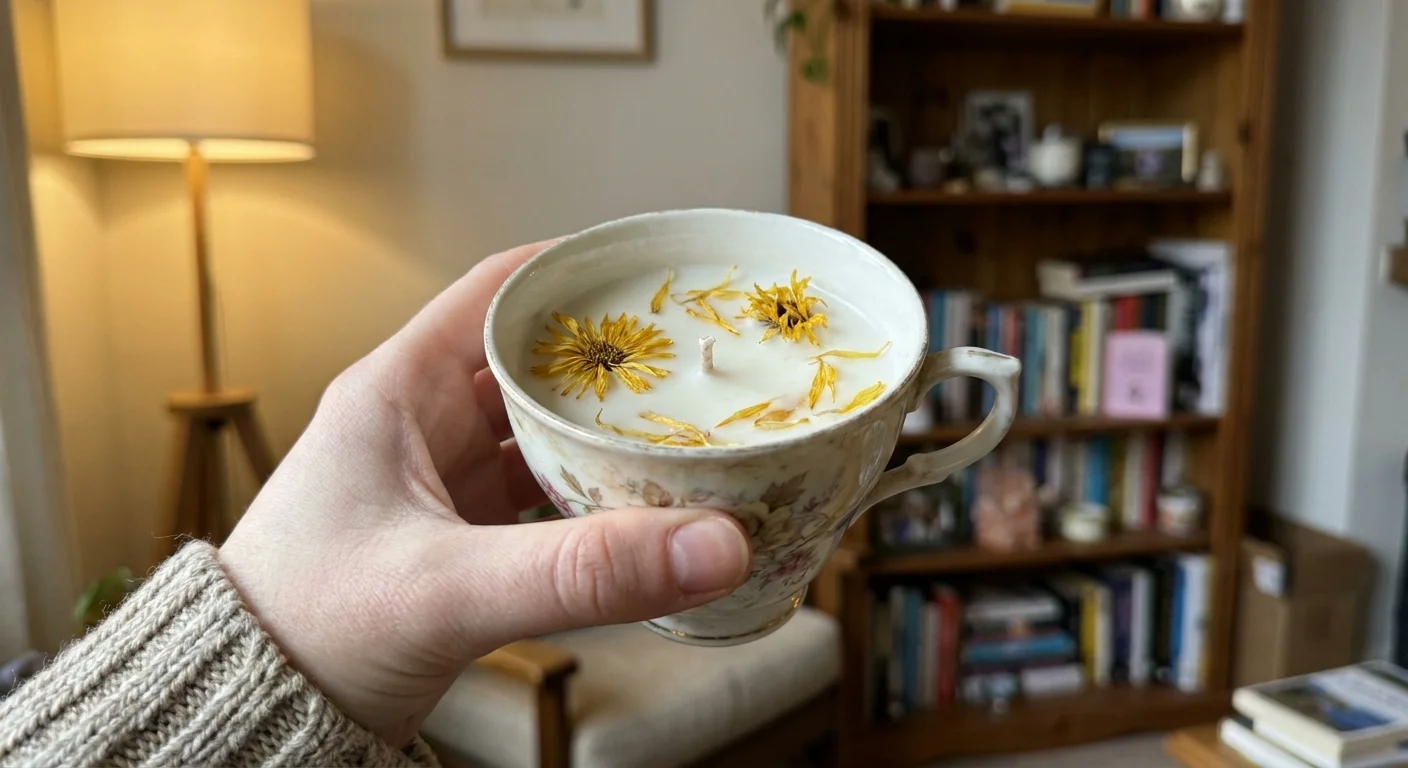
1. Upcycled Botanical Teacup Candles
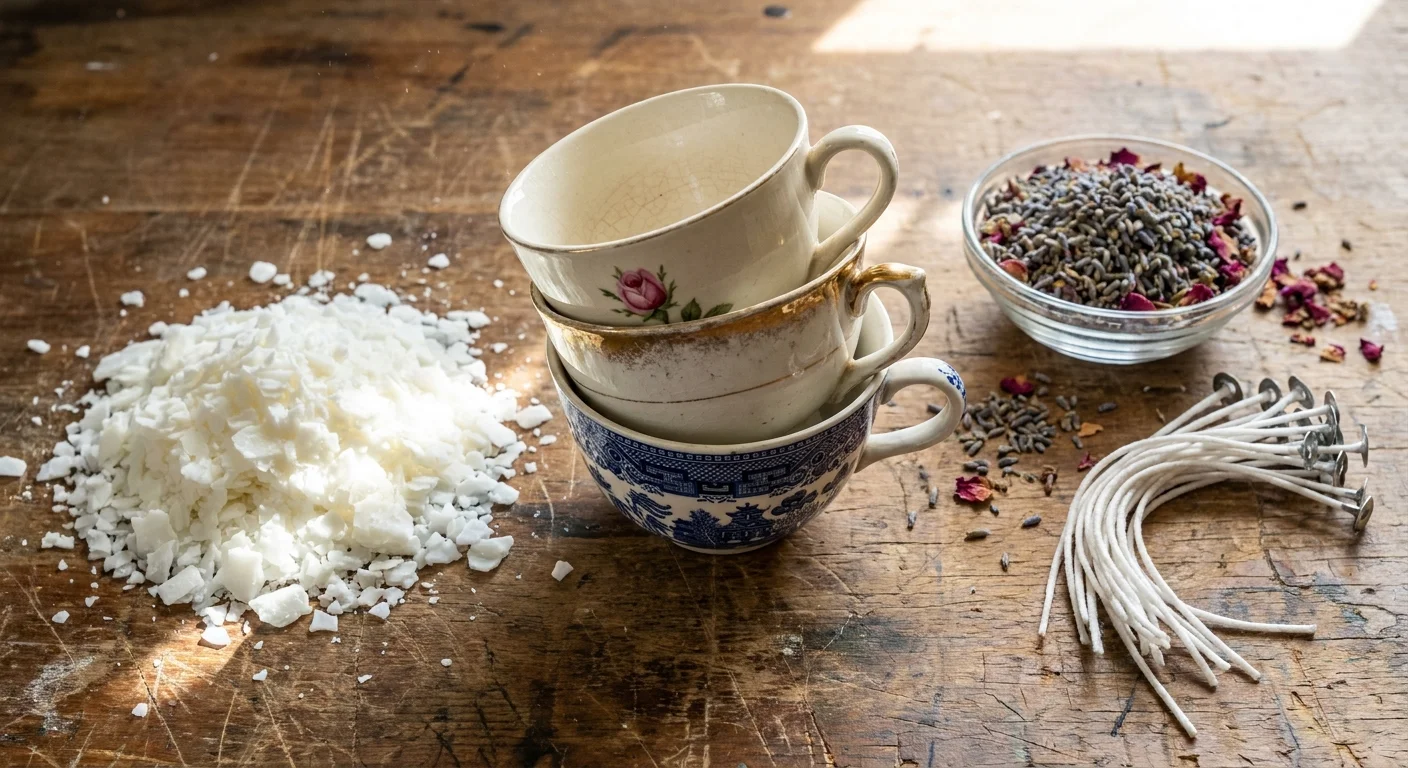
Inspiration and Materials
Vintage teacups transformed into custom botanical candles deliver an immediate visual impact, turning forgotten thrift store ceramics into high-end home fragrance items. You can source beautifully patterned porcelain cups for pennies at local charity shops. Gather soy wax flakes, pre-tabbed cotton wicks, your favorite essential oils, and dried flower petals. Before you begin, thoroughly inspect your teacups for hairline fractures; pouring hot wax into cracked ceramics poses a significant safety hazard. Ensure you use a double boiler for melting the wax to maintain precise temperature control. For comprehensive safety protocols, consult resources from the National Candle Association to guarantee your homemade creations burn safely and cleanly.
Build Process and Styling
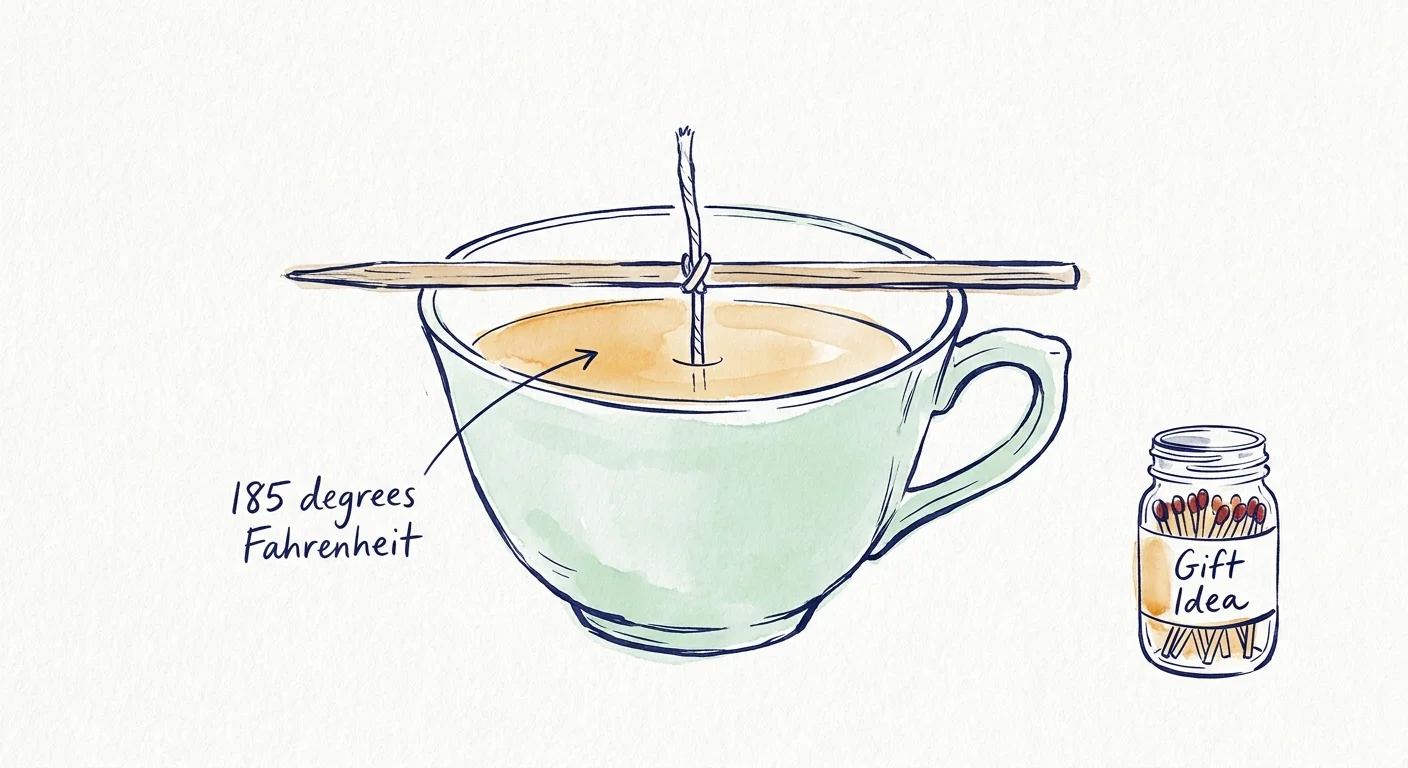
Secure the wick to the bottom center of your clean, dry teacup using a dot of hot glue. Suspend the wick straight by wrapping the excess length around a wooden skewer resting across the cup’s rim. Melt your soy wax slowly until it reaches exactly 185 degrees Fahrenheit, remove the pot from the heat, and blend in your chosen essential oils. Pour the liquid gold carefully into the teacup, stopping a half-inch below the rim. As the surface begins to turn slightly opaque during the curing time—typically around forty-five minutes—gently press your dried botanical elements onto the top layer. Allow the candle to cure undisturbed for forty-eight hours. Gift these candles alongside a decorative glass jar of matches. Advise your recipient to trim the wick to one-quarter inch before every use to prevent soot buildup and ensure a long-lasting, even burn.
2. Minimalist Air-Dry Clay Catchalls
Inspiration and Materials
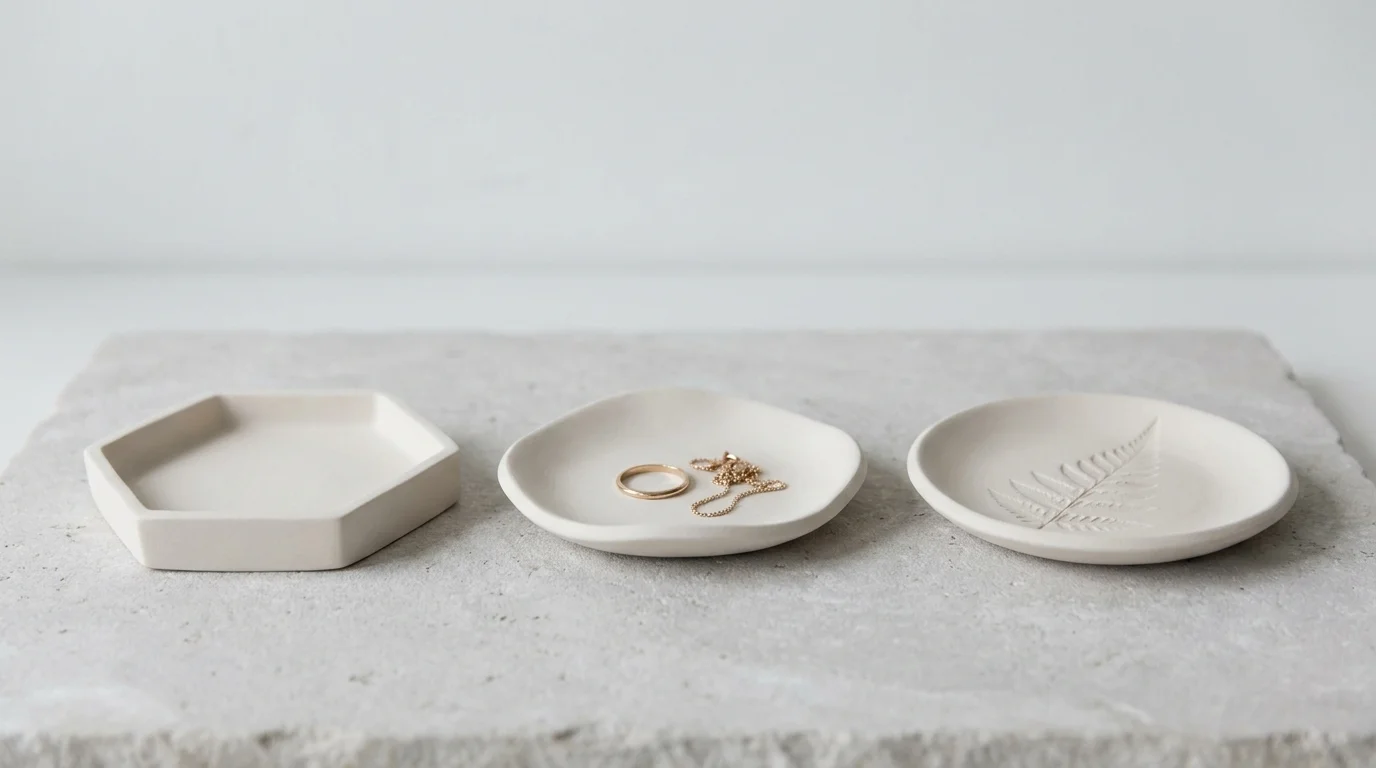
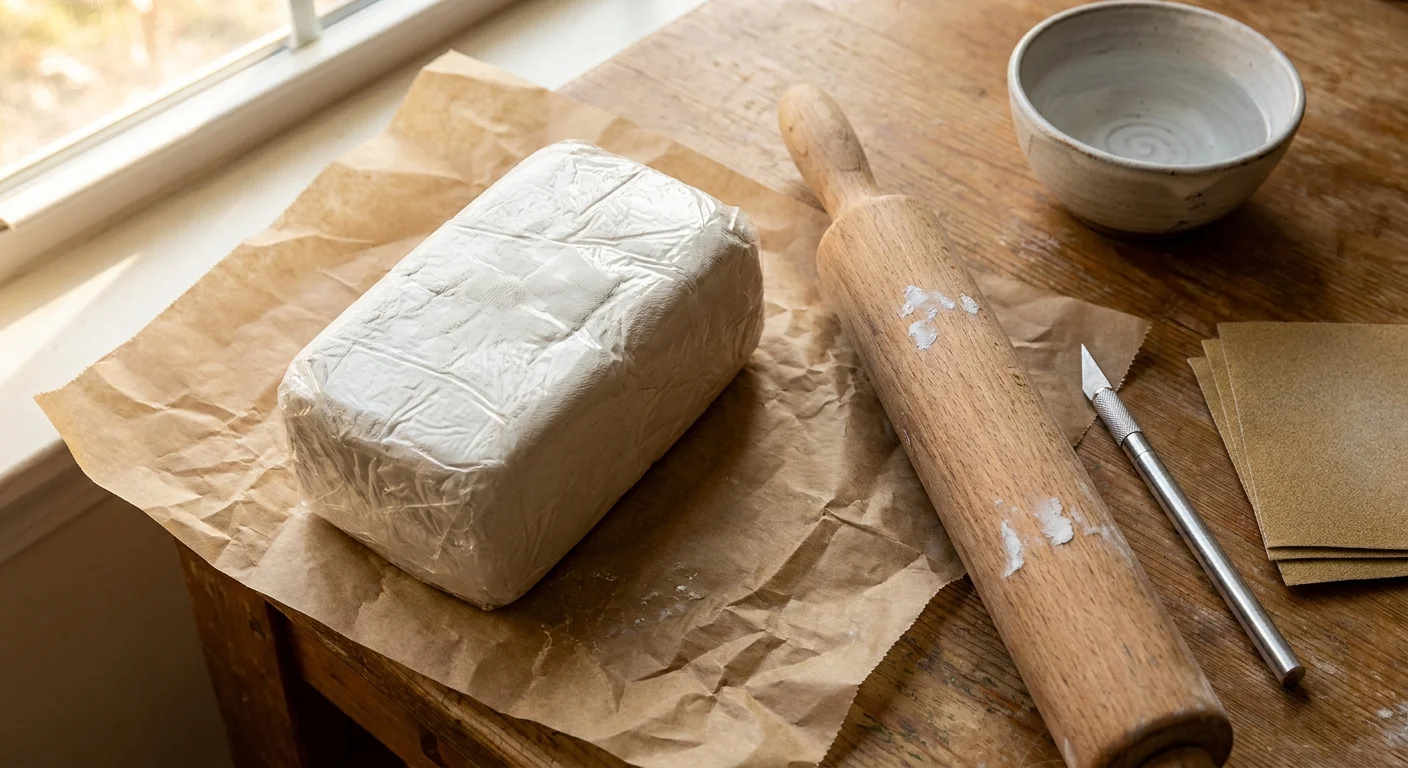
Air-dry clay offers the sophisticated look of fired ceramics without the need for an expensive kiln, making it an ideal medium for crafting chic jewelry catchalls. The tactile process of molding smooth clay yields incredibly professional, display-ready results. You need only a block of high-quality air-dry clay, a rolling pin, a sharp craft knife, and fine-grit sandpaper. To add custom textures, gather household items like lace doilies, sturdy ferns, or embossed wooden stamps. Keep a small bowl of water nearby to smooth out rough edges as you work. If you plan to scale up your production for craft fairs, checking out guides from established pottery craft guilds will provide advanced insights into bulk clay handling and structural drying techniques.
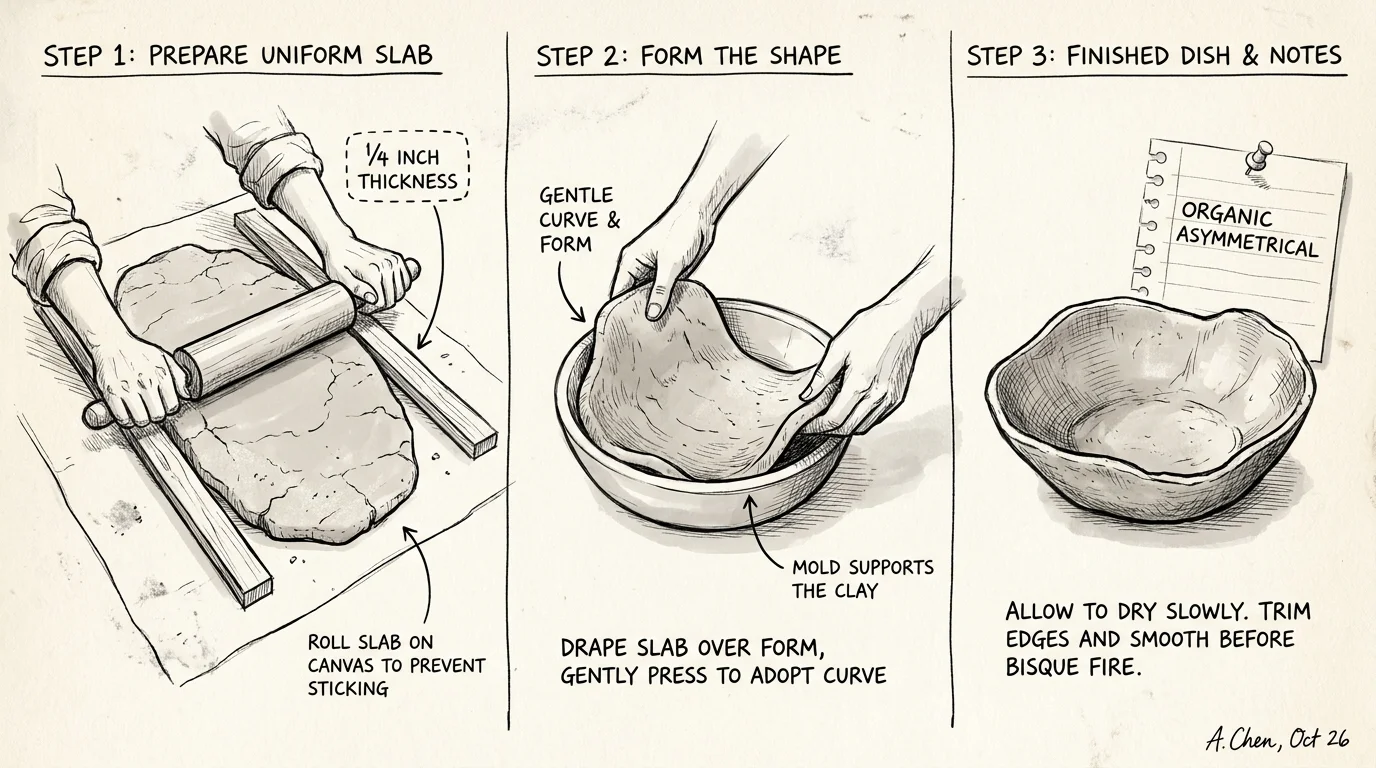
Build Process and Styling
Roll a handful of clay into a smooth ball, then flatten it with your rolling pin until it reaches a uniform quarter-inch thickness. Press your textured object firmly into the surface to leave a crisp impression. Cut out your desired shape using your craft knife—organic asymmetrical circles or sharp geometric hexagons work beautifully. Gently lift the edges of your shape and drape the clay inside a shallow, dry bowl. This technique forces the piece to dry with a subtle, functional curve. Depending on your local humidity, curing times range from twenty-four to seventy-two hours. Once completely dry, sand the edges until they feel perfectly smooth to the touch. Present the catchall wrapped in unbleached tissue paper. To protect the porous unglazed finish, apply a thin coat of matte acrylic sealer, and remind your loved one to wipe it clean with a dry cloth rather than submerging it in water.
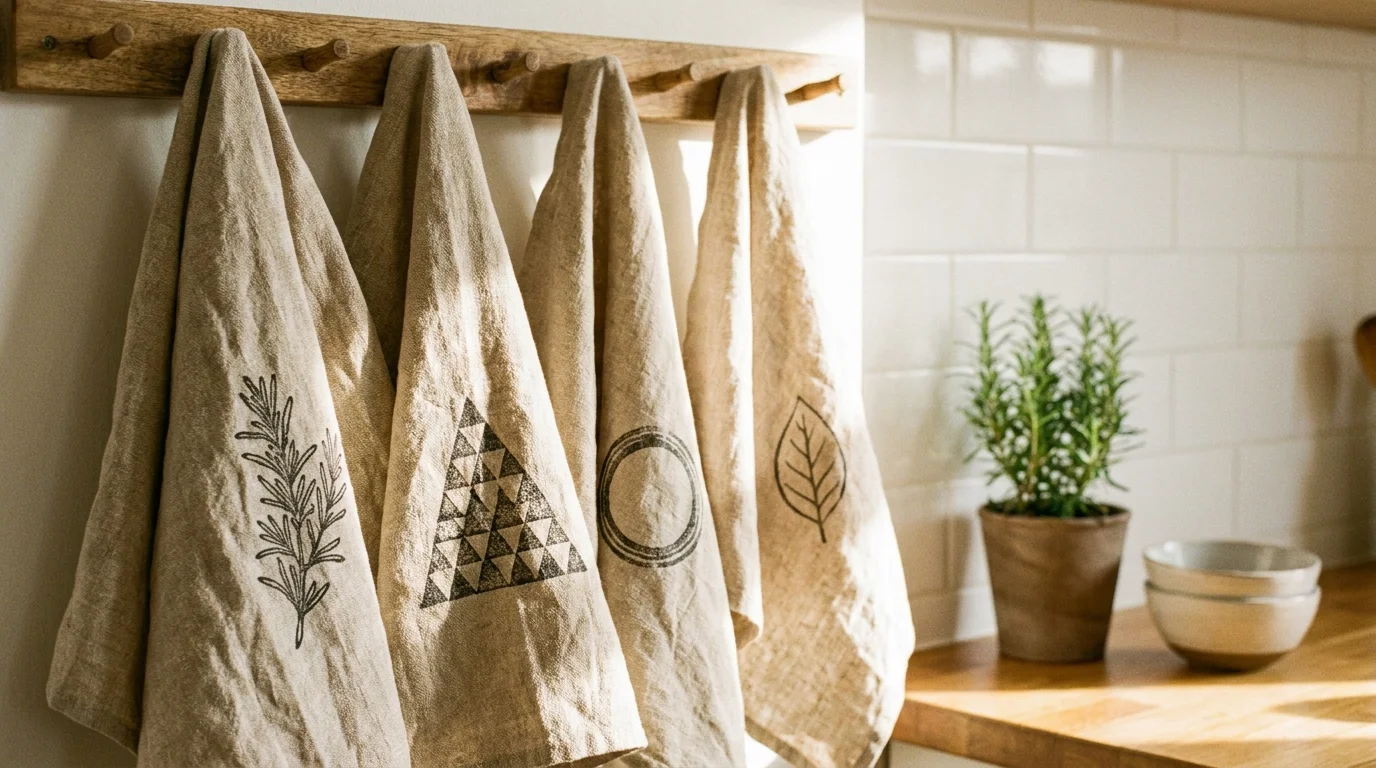
3. Hand-Stamped Linen Tea Towels
Inspiration and Materials
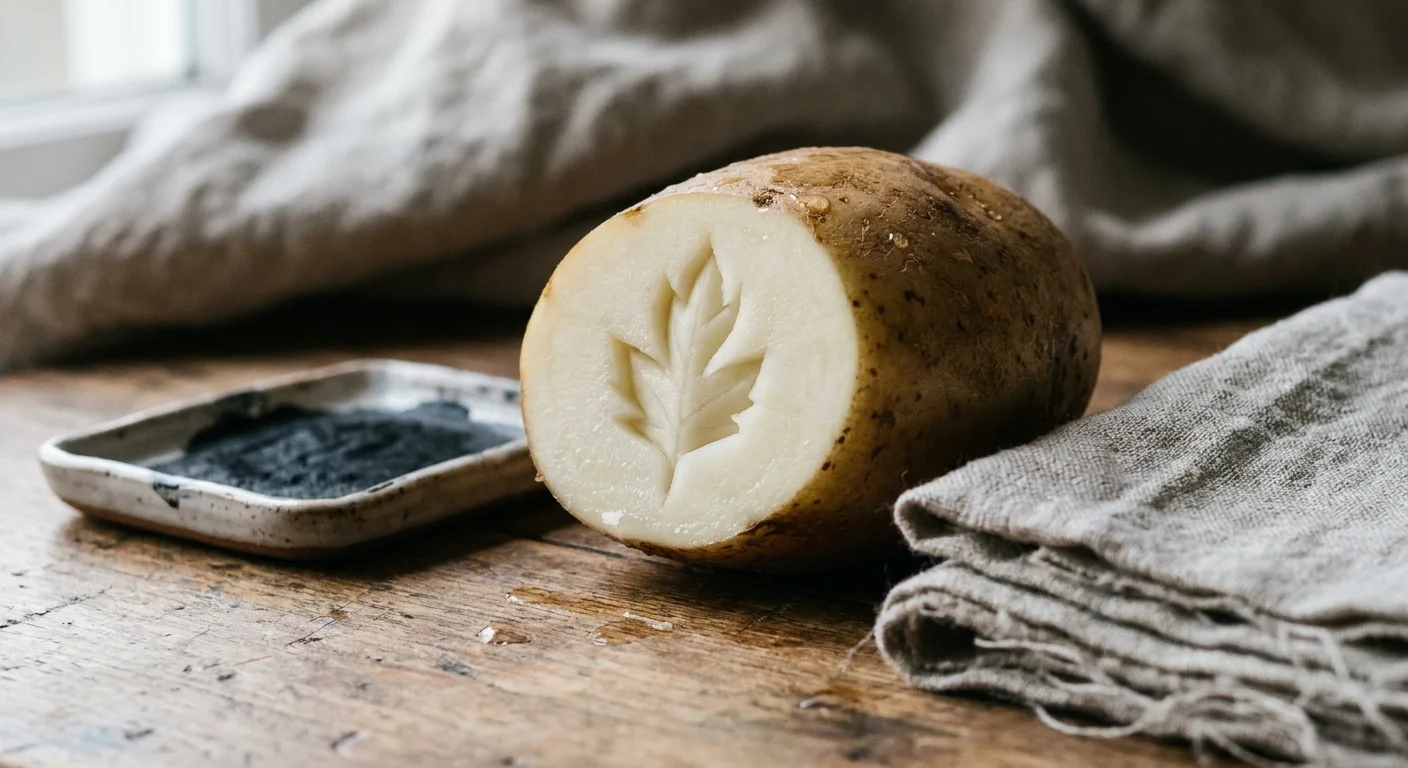
Transforming plain fabric into bespoke kitchen art provides an incredibly satisfying maker experience and gives your recipient a highly functional present. Hand-stamped tea towels emulate expensive artisan textiles for a fraction of the boutique cost. Start by purchasing inexpensive, unbleached cotton or linen blanks in bulk. For your printing tools, you can use traditional carving blocks or upcycle kitchen scraps like halved lemons and potatoes. You will also need permanent fabric ink and a small foam brayer. Always pre-wash your fabric blanks to remove commercial sizing chemicals, ensuring the ink bonds permanently to the fibers. If you want to explore more complex, multi-colored patterns, review advanced fabric block printing techniques to elevate your stamp designs.
Build Process and Styling
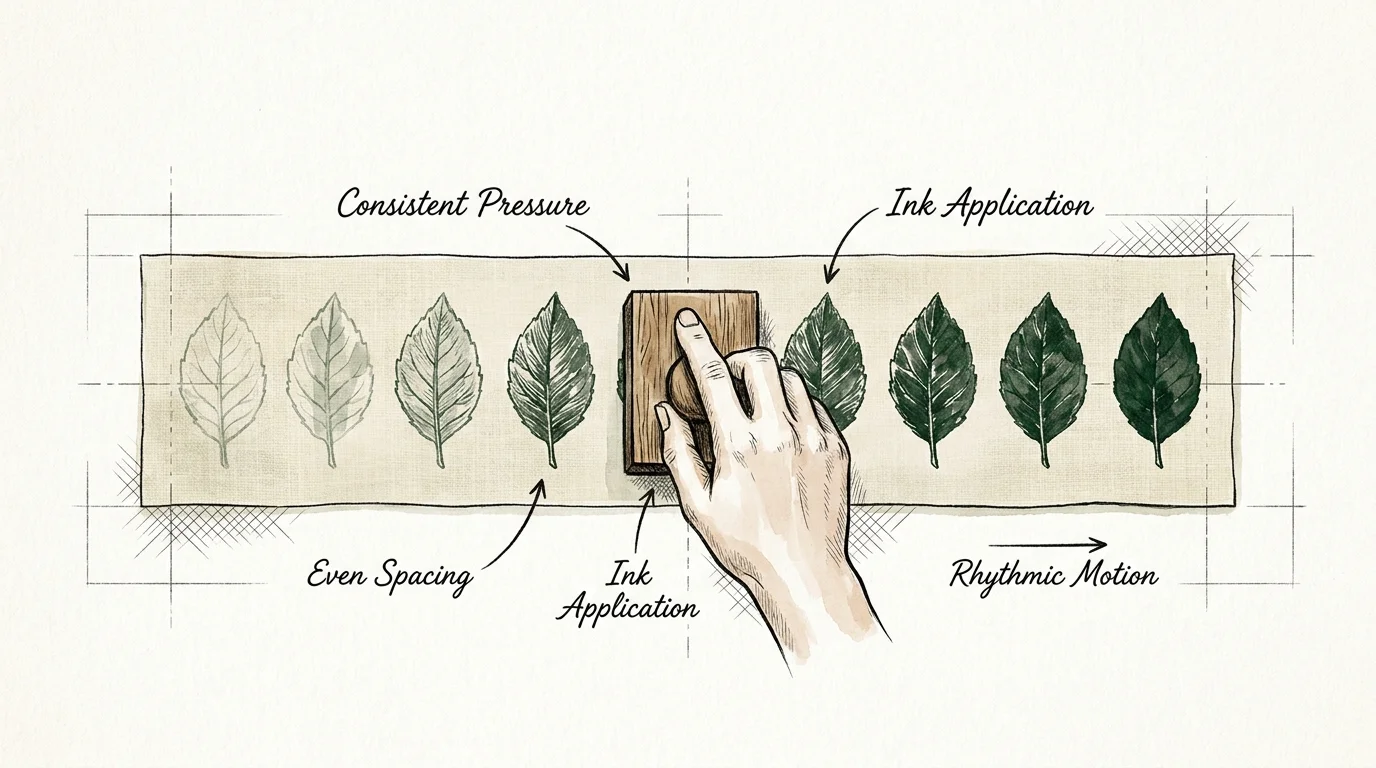
Lay your pre-washed, ironed tea towel flat on a protected surface, placing a piece of scrap cardboard underneath to catch any ink bleed-through. Roll a thin, even layer of fabric ink onto your stamp. Press the stamp firmly and evenly onto the fabric, holding it steady for three seconds to allow the woven fibers to absorb the pigment fully. Lift the stamp straight up to avoid smudging the design. Repeat this process to create geometric borders or random, organic patterns across the cloth. Let the ink dry completely overnight. Set the ink permanently by ironing the reverse side of the towel on high heat for three uninterrupted minutes. Fold the finished towel neatly, tie it with a rustic piece of jute twine, and slip a wooden stirring spoon under the knot for a charming presentation. These durable towels withstand standard machine washing, though washing in cold water will keep the stamped colors vibrant for decades.
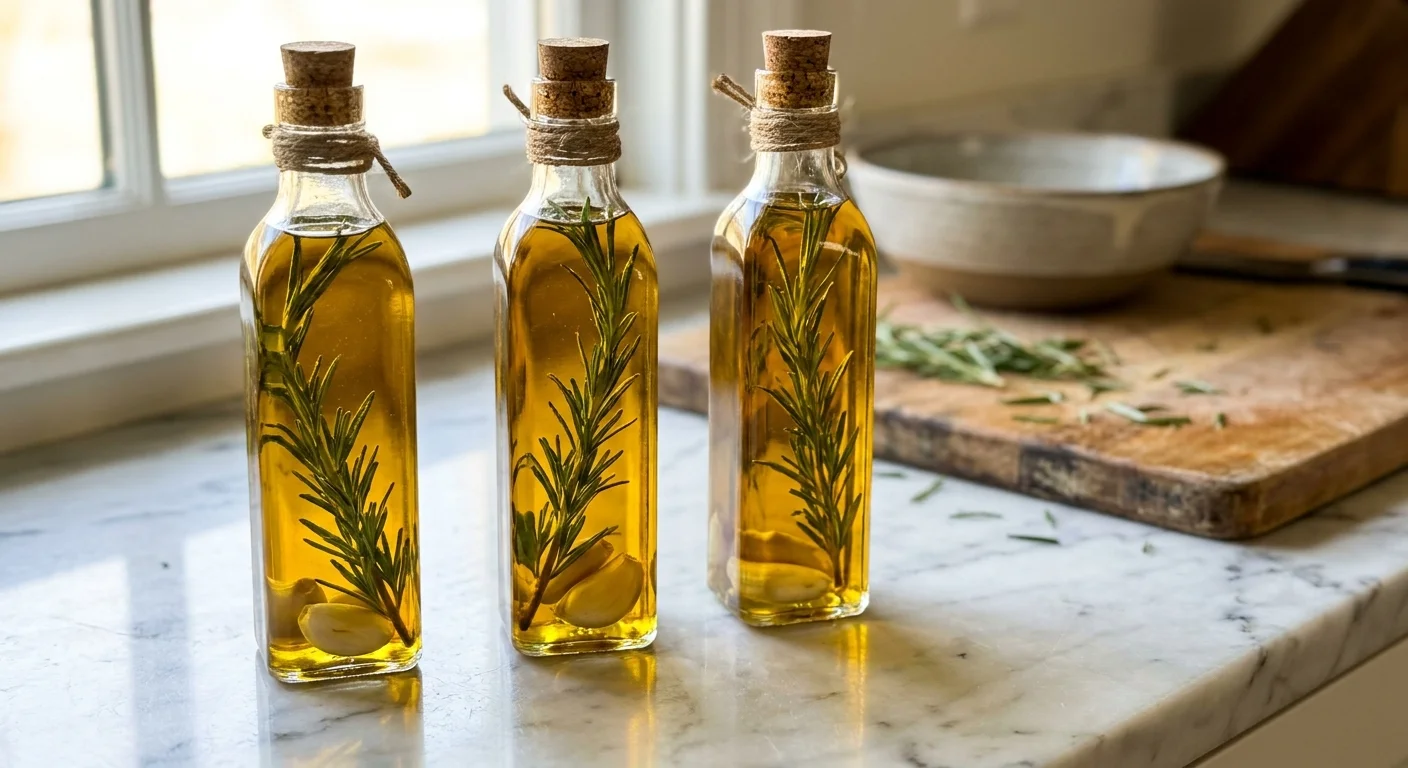
4. Infused Rosemary and Garlic Culinary Oils
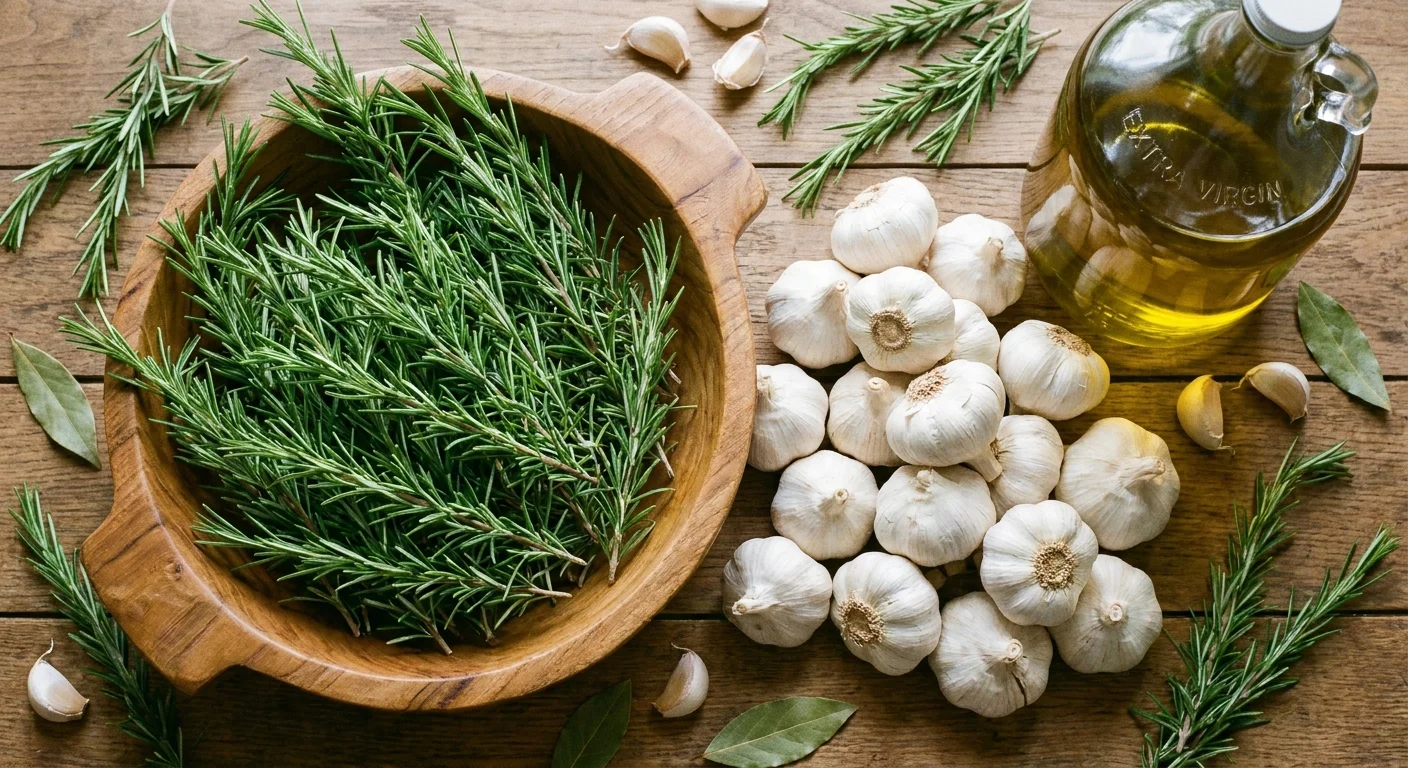
Inspiration and Materials
Gourmet infused oils look stunning displayed on a kitchen counter and deliver an intensely practical flavor boost to everyday cooking. The rich, golden hue of the oil contrasting with floating green herbs provides a sensory delight before the bottle is even unstoppered. Source high-quality extra virgin olive oil in large tins to keep your base costs down. You need fresh rosemary sprigs, peeled garlic cloves, and sterilized glass bottles with tight-sealing corks or swing-top lids. Safety remains paramount when infusing raw garlic in oil; you must heat the ingredients to eliminate any potential moisture-borne bacteria. Alternatively, using completely dried herbs and dehydrated garlic removes the moisture risk entirely.
Build Process and Styling
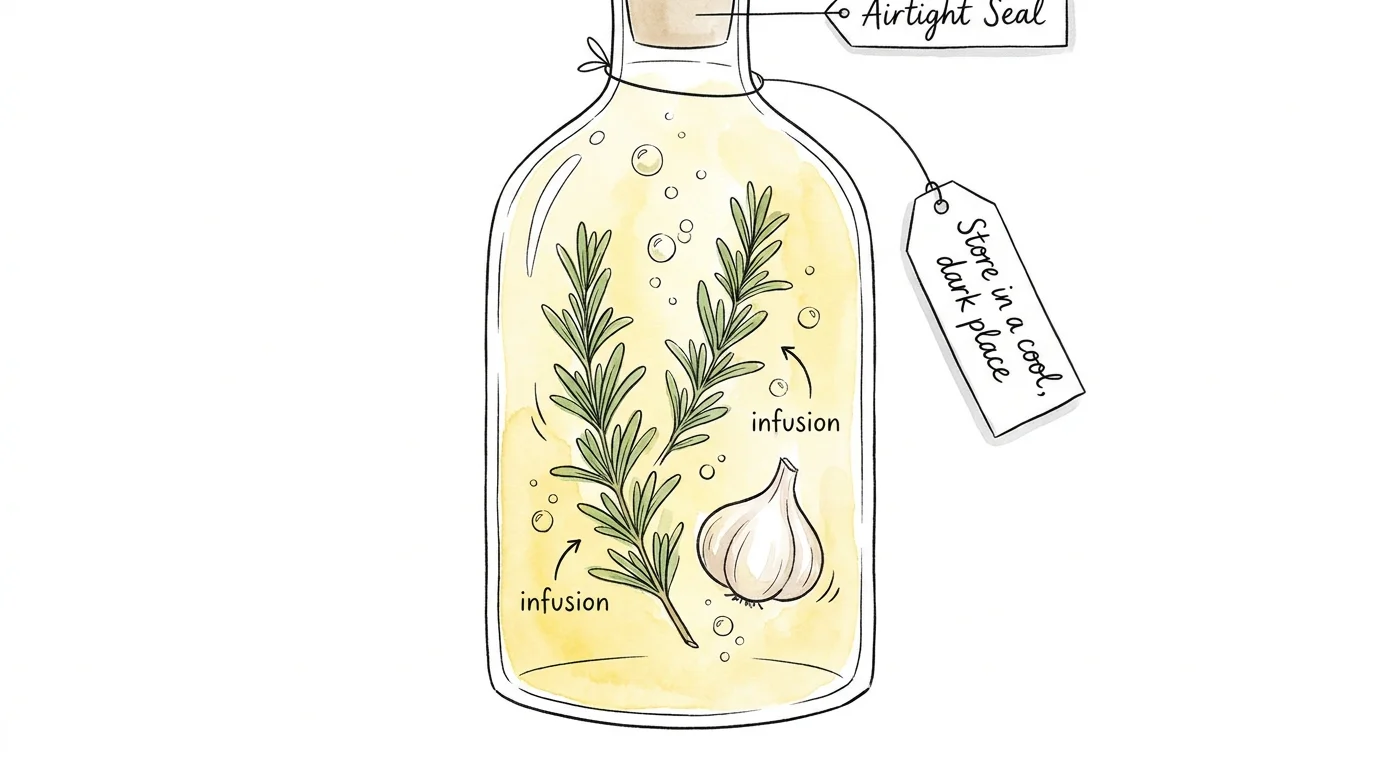
In a heavy-bottomed saucepan, combine your olive oil, fresh rosemary, and whole garlic cloves. Warm the mixture over exceptionally low heat until it reaches roughly 140 degrees Fahrenheit. You will know the oil is ready when the garlic becomes highly fragrant and tiny bubbles form around the herb stems. Remove the pot from the heat and let it cool completely to room temperature. Carefully strain the oil into your sterilized glass bottles using a fine-mesh metal funnel, discarding the cooked solids. Drop one fresh, thoroughly dried sprig of rosemary into the bottle for visual appeal before sealing the stopper tightly. Create a custom paper label detailing the flavor profile and attach it to the bottle neck with a velvet ribbon. Because you used heated fresh ingredients, advise your recipient to store the oil in the refrigerator and consume it within one month. The chilled oil may become slightly cloudy, but it will quickly return to its beautiful liquid state when brought back to room temperature.
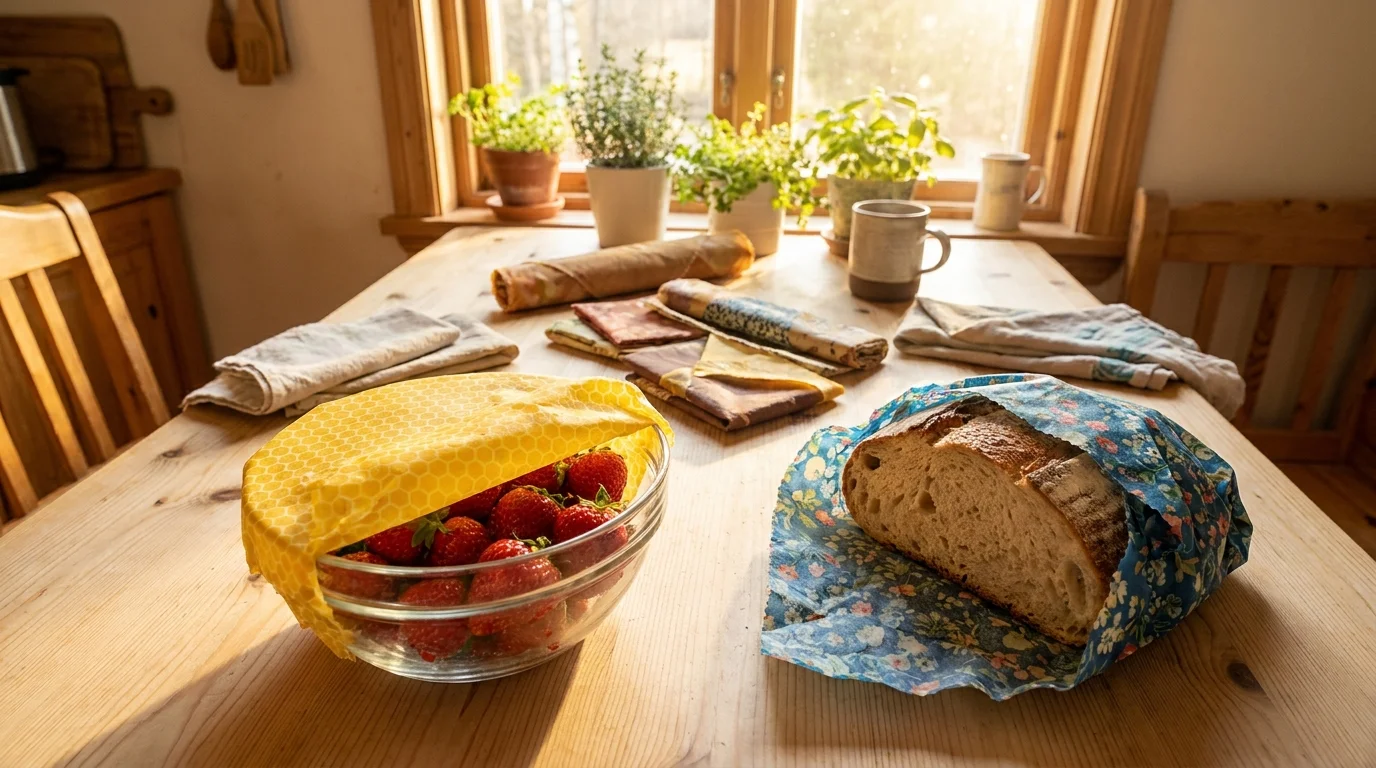
5. Sustainable Beeswax Food Wraps
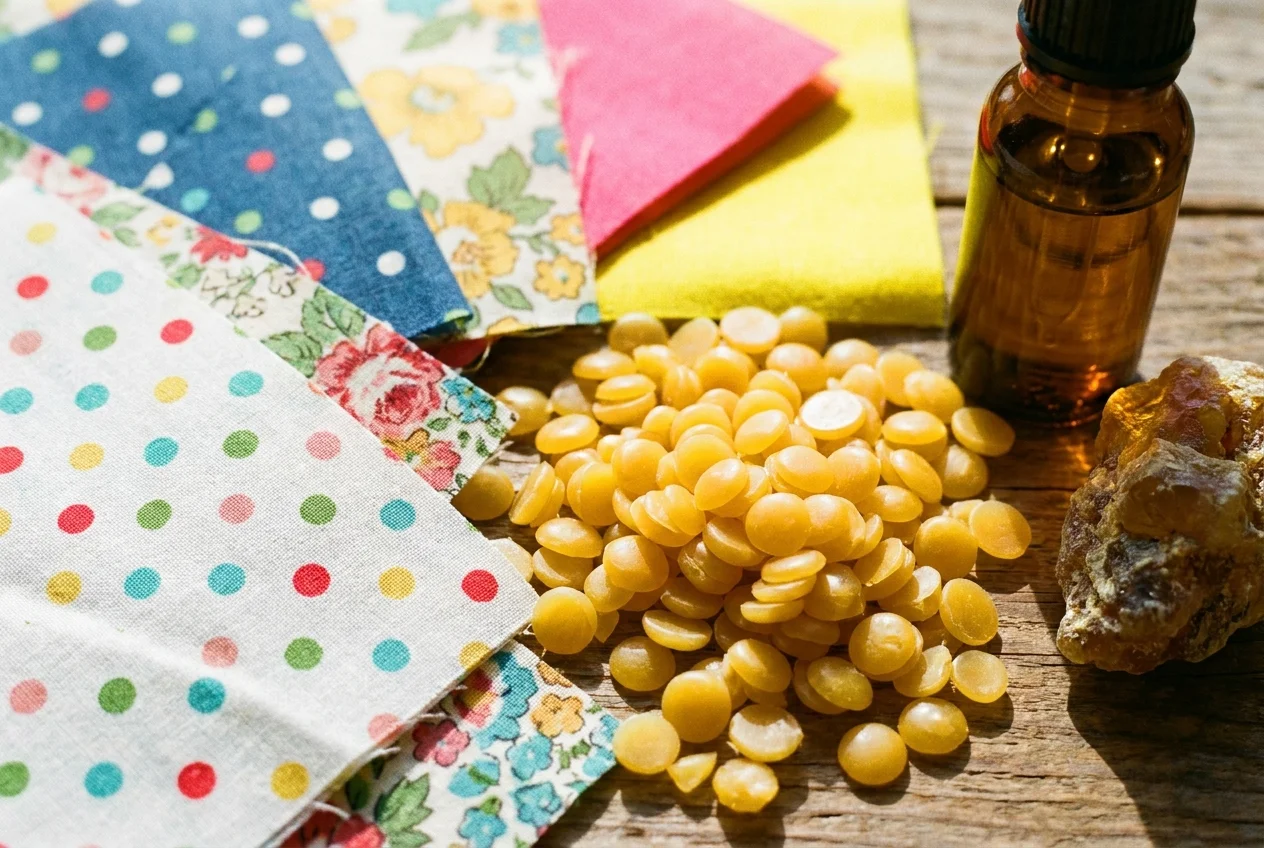
Inspiration and Materials
Eco-conscious gifts resonate deeply with modern sensibilities, and reusable beeswax food wraps offer a brilliant zero-waste alternative to disposable plastic wrap. This project transforms charming fabric remnants into stiff, moldable sheets that hug ceramic bowls and wrap sandwiches perfectly. You need lightweight, one-hundred-percent cotton fabric cut into functional squares, cosmetic-grade beeswax pellets, powdered pine rosin to add essential stickiness, and a few drops of jojoba oil to keep the wrap pliable. Gather flat baking sheets and silicone parchment paper for the melting phase. Relying on advice from prominent upcycling experts, always utilize scrap fabric from old dress shirts or thrifted bedsheets to ensure your gift remains truly sustainable and budget-friendly.
Build Process and Styling
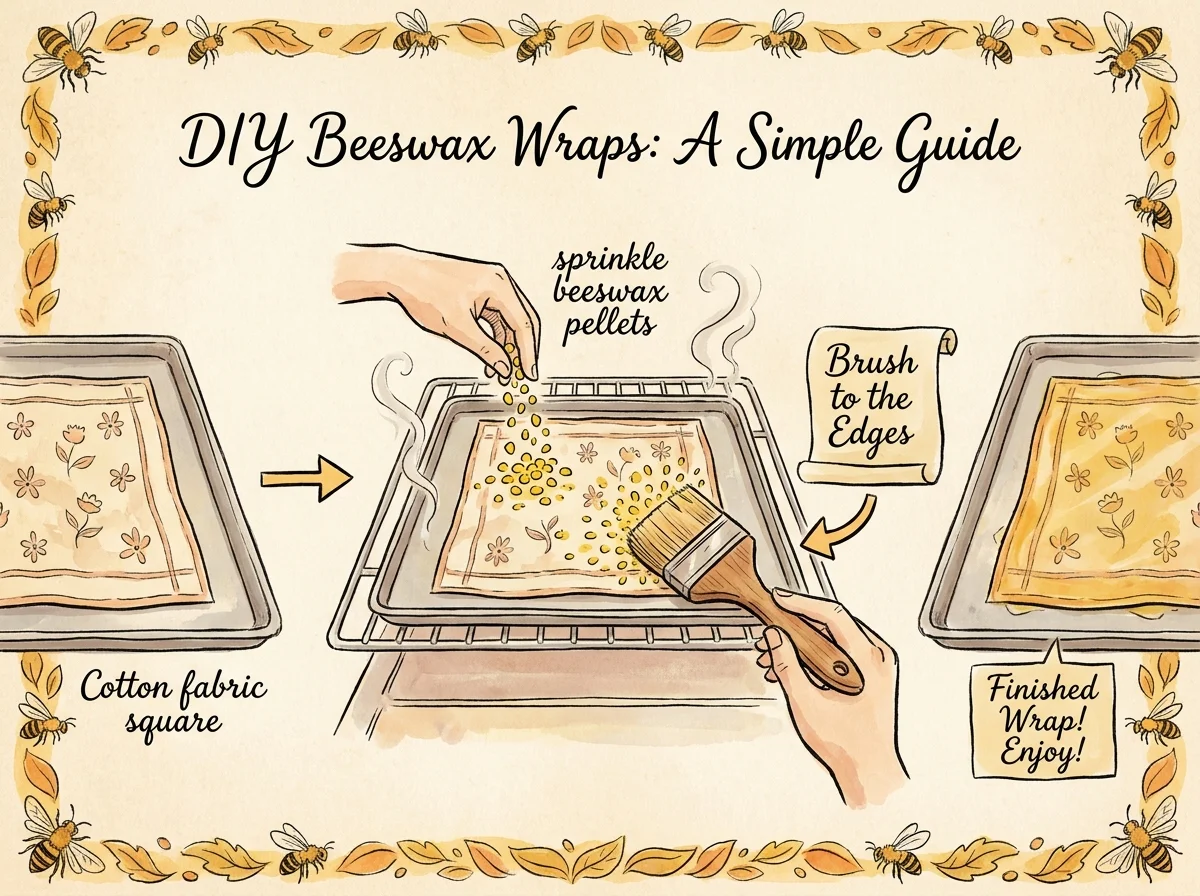
Preheat your oven to 200 degrees Fahrenheit. Place a square of your cotton fabric flat onto a parchment-lined baking sheet. Sprinkle an even, sparse layer of beeswax pellets over the fabric, followed by a light dusting of pine rosin and three scattered drops of jojoba oil. Slide the tray into the oven for roughly five minutes, watching closely until the wax completely melts into a glossy sheen. Carefully remove the tray and use a dedicated, stiff craft paintbrush to spread the liquid wax evenly across any dry patches on the fabric edges. Use metal tongs to lift the hot wrap by two corners and wave it gently in the air; it will cool and stiffen remarkably fast, usually in under thirty seconds. Fold a set of three wraps in varying sizes and secure them with a simple paper bellyband. To clean these wraps, your recipient must wash them gently in cool water with mild soap, as hot water will instantly melt and ruin the protective wax coating.
6. Pressed Botanical Framed Art
Inspiration and Materials
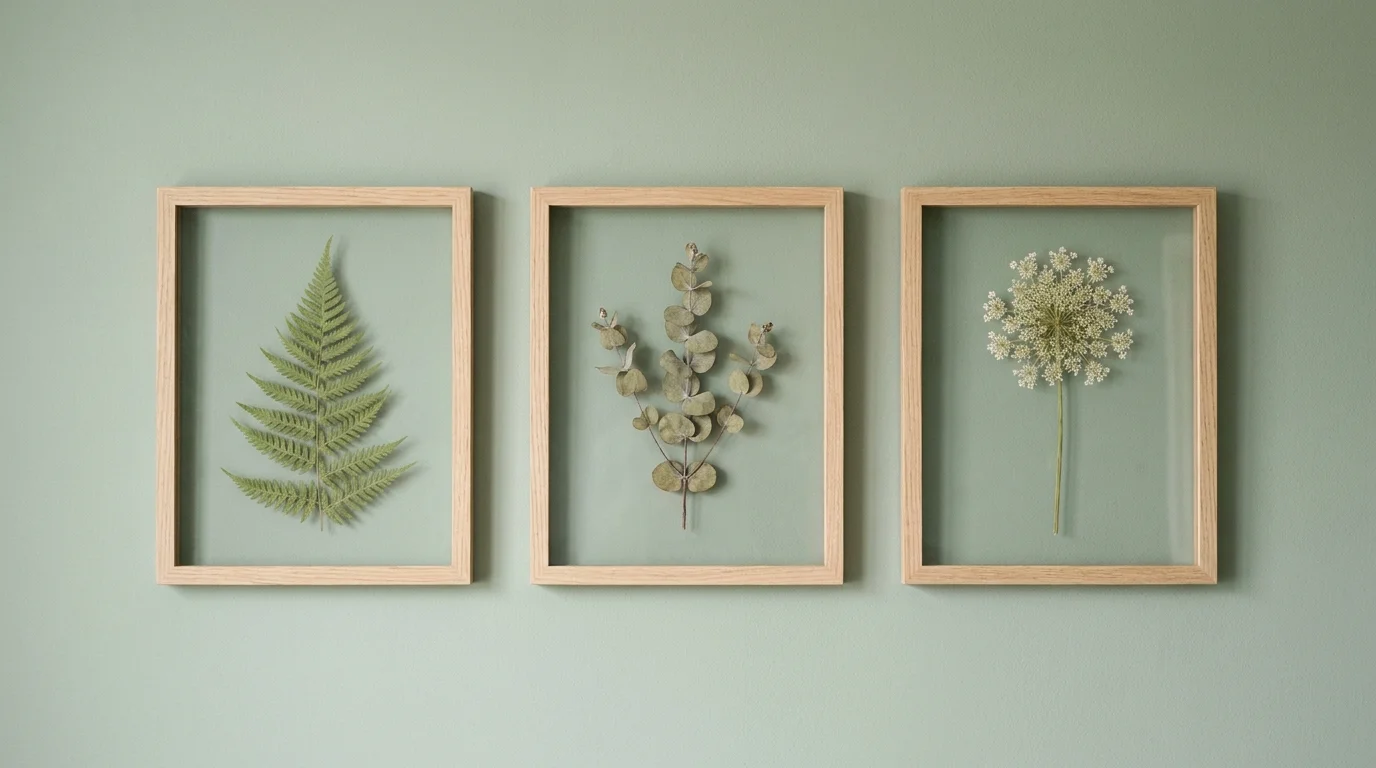
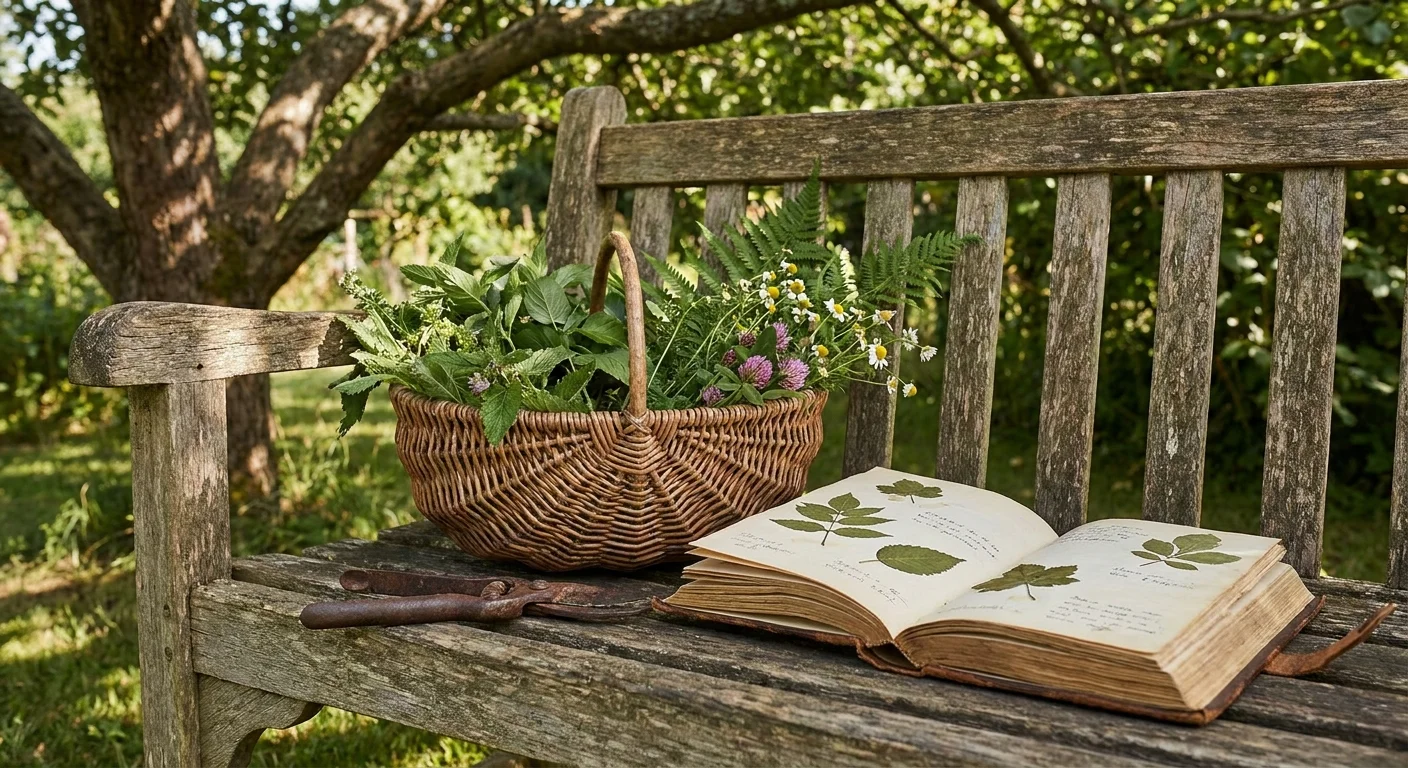
Capturing the ephemeral beauty of a garden in a permanent display creates a deeply sentimental and visually striking gift. Pressed flower art turns simple weeds and backyard blooms into delicate, architectural masterpieces. You will need a collection of fresh leaves and flowers, heavy books or a traditional wooden flower press, smooth absorbent paper, and an inexpensive floating glass frame. When foraging, choose flat-faced flowers like pansies, cosmos, or delicate ferns, as thick blooms like roses hold too much moisture and tend to rot during the pressing process. If you want to refine your collection techniques, consult detailed botanical pressing instructions to understand the varying moisture retention properties of different plant species.
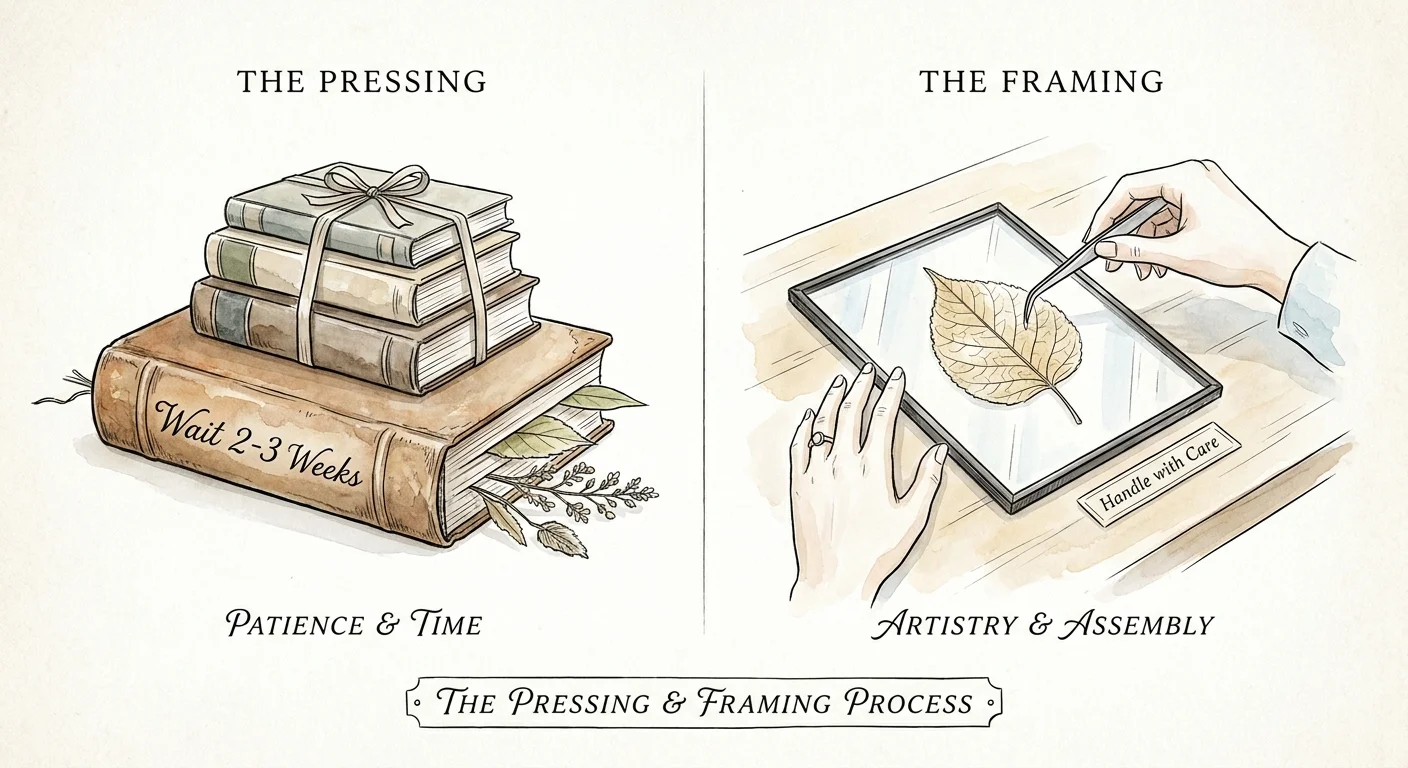
Build Process and Styling
Place your freshly gathered foliage face-down between two sheets of smooth, absorbent paper. Insert this paper sandwich into the middle of a heavy dictionary, stacking additional weight on top of the book. Leave the flowers completely undisturbed for two to three weeks to allow the plant moisture to fully evaporate. Once the botanicals feel paper-thin and brittle to the touch, use tweezers to carefully arrange them on the bottom glass pane of your floating frame. Secure the delicate stems with minuscule dabs of clear craft glue if necessary to prevent slipping. Close the back glass pane securely to lock the natural composition in place. The transparent background allows the vibrant organic colors to pop against any wall hue. Warn your recipient to hang the frame away from direct, harsh sunlight, as ultraviolet rays will rapidly bleach the natural pigments and turn the bright green ferns a pale, dusty yellow.
7. Exfoliating Coffee and Sugar Body Scrubs
Inspiration and Materials
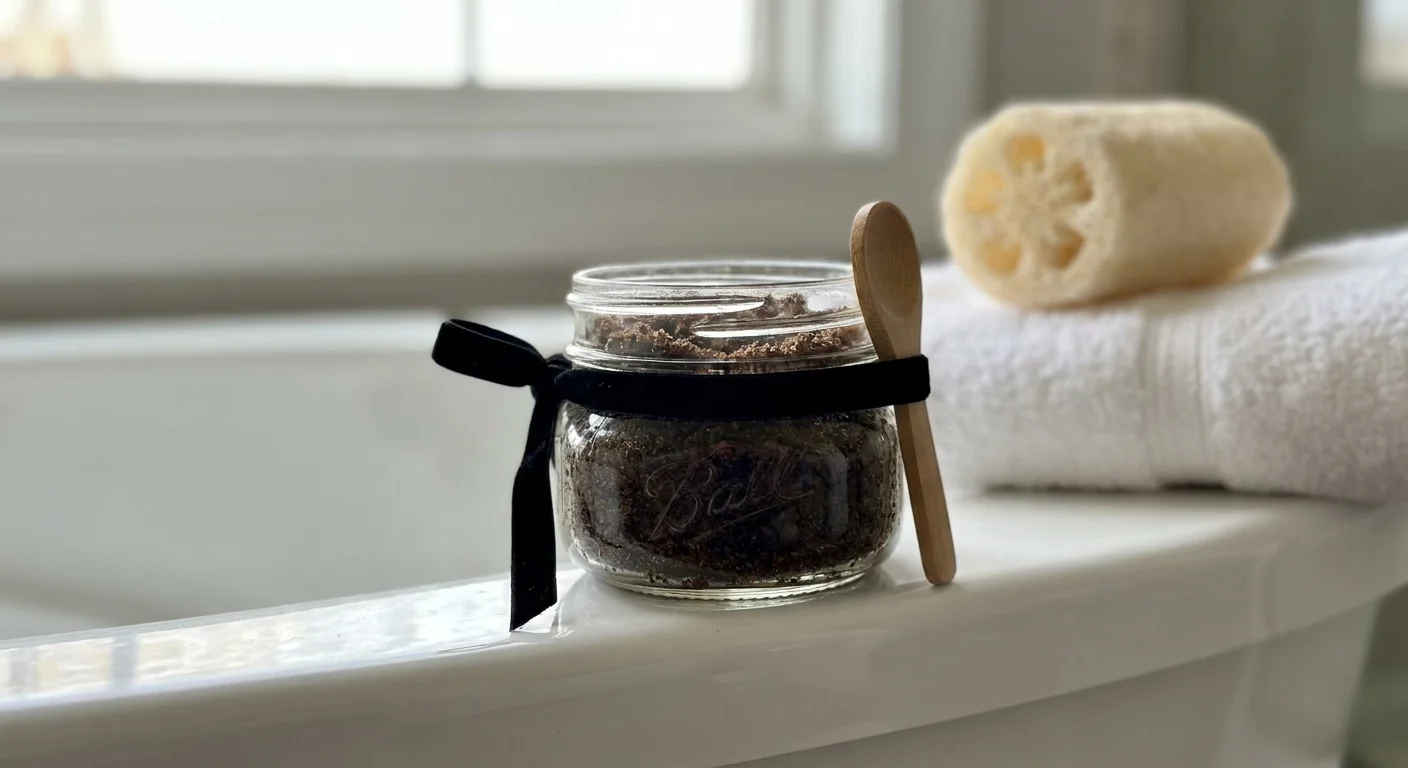
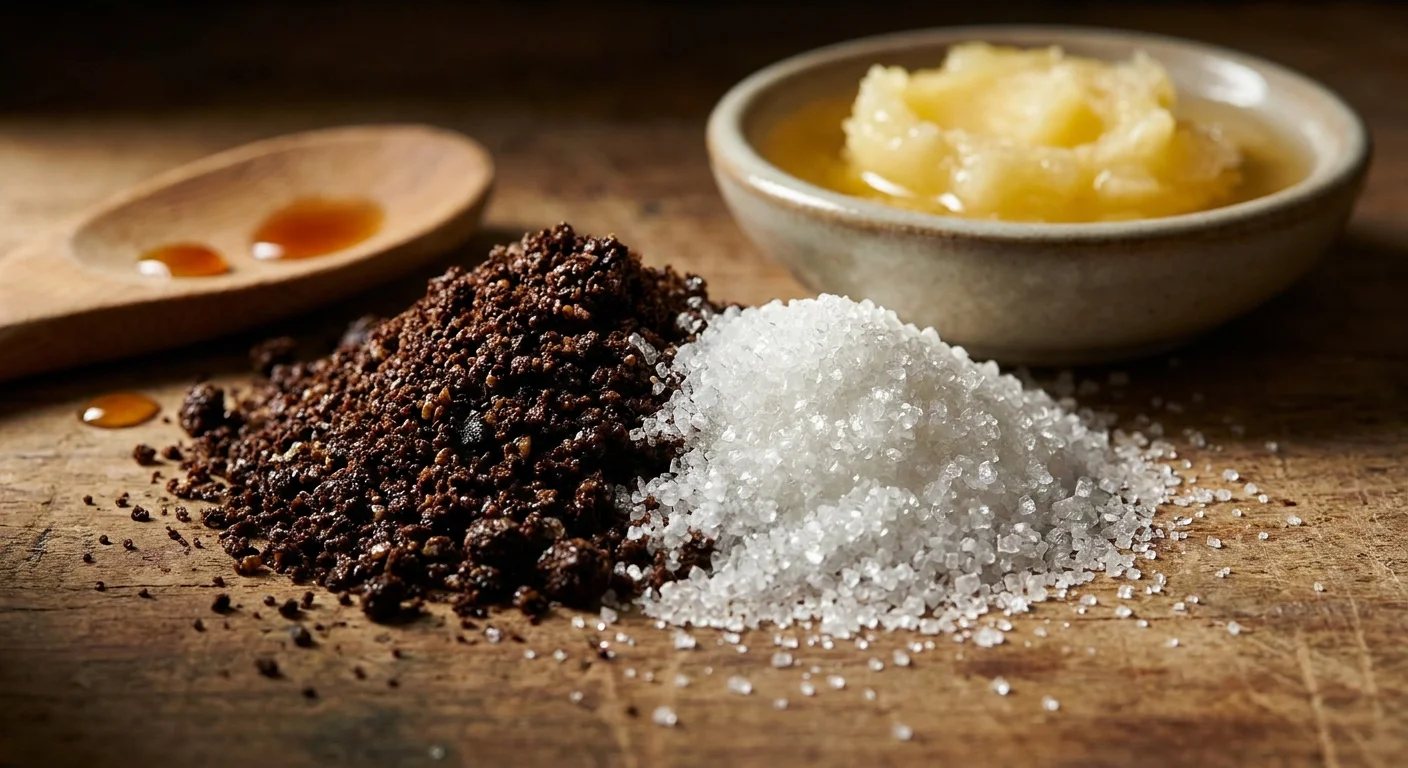
Whipping up a batch of luxurious body scrub proves that high-end spa experiences do not require high-end budgets. The intoxicating aroma of roasted coffee combined with the mechanical exfoliation of coarse sugar provides instant gratification and glowing skin. This project represents the ultimate kid-friendly adaptation; children can easily measure and mix the ingredients safely without utilizing any heat sources or sharp tools. You need leftover, dried coffee grounds, coarse raw sugar, melted coconut oil, and a generous splash of pure vanilla extract. Source wide-mouth glass mason jars for packaging, ensuring the recipient can easily scoop out the thick scrub while standing in the shower.

Build Process and Styling
In a large glass mixing bowl, combine one cup of dry coffee grounds with one cup of coarse raw sugar. Slowly pour in one-half cup of melted coconut oil, stirring constantly with a wooden spoon until the mixture resembles damp, moldable sand. Add one teaspoon of vanilla extract to round out the harsh coffee scent with a warm, sweet bakery note. Spoon the scrub generously into your sterilized glass jars, packing it down lightly with the back of your spoon. Wipe the rim of the jar meticulously before screwing on the metal lid to prevent the sugary oil from locking the threads shut. Tie a tiny wooden spoon to the side of the jar using a piece of natural raffia. Instruct your recipient to massage the scrub in gentle circular motions on damp skin before rinsing thoroughly. Since the scrub contains no chemical preservatives, it should be kept out of the direct water stream to prevent mold and used within two months for optimal freshness.
Frequently Asked Questions
How can I keep the overall cost down when making multiple gifts? Sourcing materials strategically drastically reduces your financial investment. Buy raw ingredients like coconut oil, beeswax pellets, and essential oils in bulk rather than in tiny, overpriced craft-sized portions. You can also upcycle household items like glass jam jars, fabric scraps, and thrifted ceramics, which instantly slashes your packaging and base material expenses without sacrificing the quality of your final presentation.
What are the quickest projects to make if I am completely out of time? If you need a gorgeous present immediately, the exfoliating coffee scrubs and infused culinary oils require less than thirty minutes of active hands-on time and completely bypass the lengthy curing processes required by clay or wax. You can gather the basic ingredients from your pantry, mix them up, bottle them beautifully, and walk out the door to your event in under an hour.
Can I use alternative tools if I lack specialized crafting equipment? You absolutely do not need to buy professional gear to achieve outstanding, professional-looking results. Instead of purchasing a dedicated wax melter, build a safe double boiler using a heat-proof glass bowl set over a standard kitchen saucepan of simmering water. Swap expensive professional fabric carving blocks for halved potatoes, and use a standard heavy textbook instead of buying a custom wooden flower press.
How do I efficiently scale these projects to create gifts for large groups? Batching your tasks saves hours of repetitive labor when making favors for weddings or office holiday parties. Prepare your workspace assembly-line style: melt one massive batch of wax for twenty candles simultaneously, or cut all your fabric squares at once before moving on to the waxing phase. Processing one step for all items simultaneously minimizes messy cleanup and keeps your production flow entirely uninterrupted.
Creative Close
Once you master these seven foundational gifts, push your newly acquired skills further by combining techniques to create elaborate, hybrid presents. Try using your leftover melted beeswax to seal the corks of your infused garlic oils, giving the culinary bottles a rustic, tamper-evident finish. You might also experiment with pressing tiny, delicate flower petals directly into your minimalist air-dry clay catchalls before they cure, merging botanical preservation with functional sculpture. The true magic of making things from scratch lies in this endless opportunity for experimentation. Grab your supplies, clear off a sturdy workspace on your kitchen table, and start crafting items that proudly reflect your unique creativity and thoughtfulness.